In this blog post, we will discuss how to add passwordless functionality to your web app, existing or new. We will use FIDO2 protocol and standard, including WebAuthn protocol – specification, which, due to its adoption by all modern browsers, allows the app, and the app developers to get the public key credentials from an Authenticator, be it a usb fido2 hardware key, your phone face or biometric authentication, or , for example windows hello feature.
Once we are done adding FIDO2 , including it’s WebAuthn protocols and authentication functionality to our app, we will firstly and mostly create a more secure and more adoptable sign in and authentication mechanism for our users to be able to sign in with no passwords at all.
By doing so, we will improve our security for our app because FIDO2 and WebAuthn use public/private keys technology, where private key is only stored in hardware Authenticator of a user that he or she takes with him while sharing public key with FIDO2 enabled app .
I will use asp.net core WebApi for the back end, and NextJs for the front end.
Notes on Passwordless:
Passwordless is a way to sign in and authenticate without a password.
The user credential (secret) is not shared with the website or app
With passwordless, an authenticator is required. It can be USB Security key, iPhone, Android Phone, WIndows Hello Feature etc …
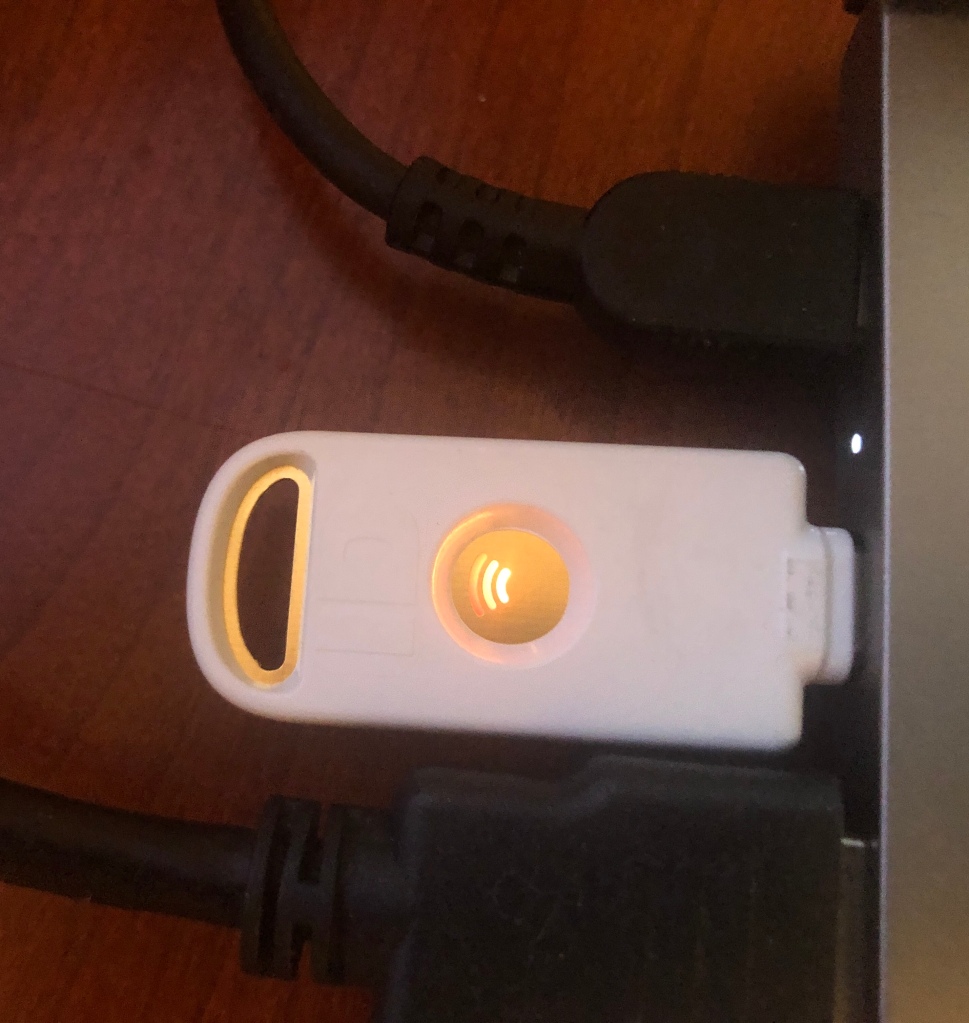
For passwordless with FIDO2 and WebAuthn project I purchased a USB Security key. Here is how it looks:
I did not need to configure it. I started using it to log in to our localhost passwordless small app. Just unpack it and plug it in into your PC or whatever machine you are using to browse the web. This one needs USB-C port.
The area in the middle with three umbrella like arcs lights up when it want you to touch it to authenticate. That is all to it.
Here is the security key in action:
This is the part where you touch it, and the website or app authenticates you. This key, stores its private key and never shares it with the world. What is shares is public key. It shares it with WebAuthn protocol, and FIDO2 protocol. Ofcourse this functionality has to be set up by developer of an app that will support passwordless authentication using FIDO2 and WebAuthn.
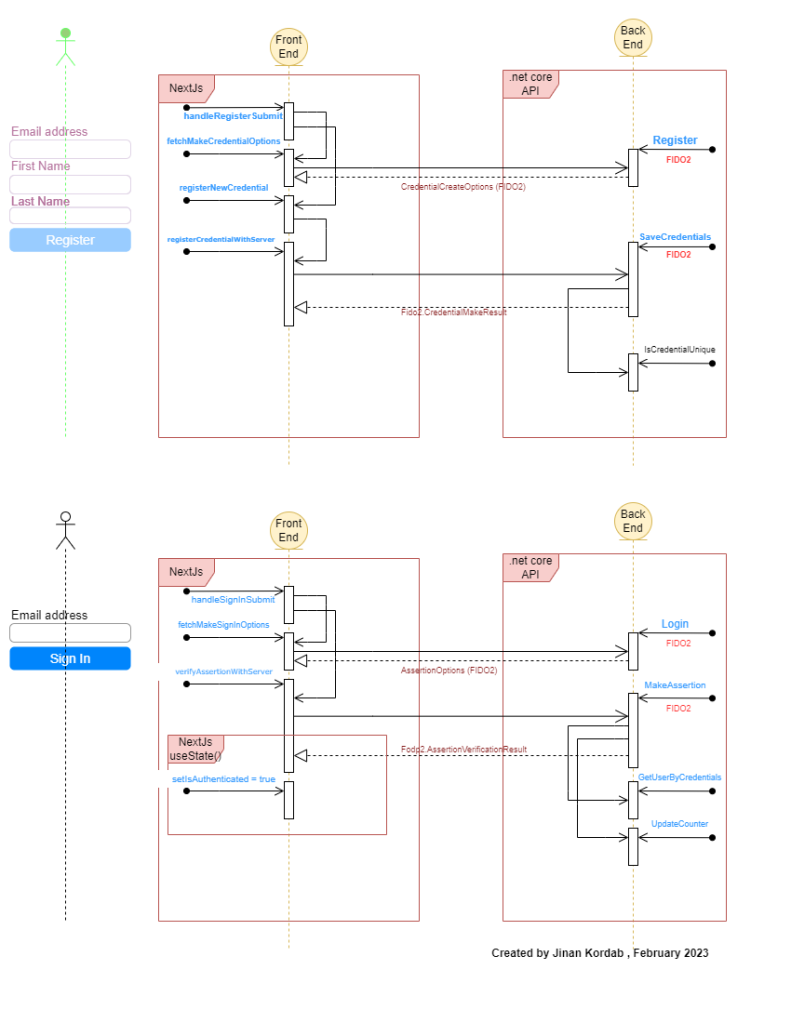
On the software part, I have created a UML sequence diagram that our small passwordless app uses. Here is the image:
There are two parts to this app: Register, and SignIn.
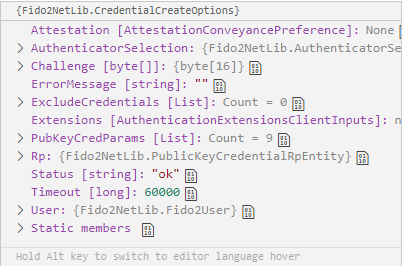
For registration, please look at the first part of the above UML diagram. The steps to commnunicate with FIDO2 protocol are sequential. First we call fetchMakeCredentialOptions on front end, it sends a request to our API to generate Fido2.CredentialCreateOptions. Here is how credentialoptions generated by FIDO2 look like:
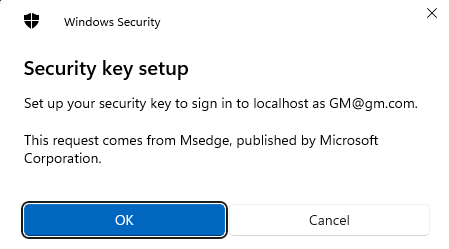
Once the client gets back those options, we assemble , so to speak, a public key, which is found here https://www.w3.org/TR/webauthn-2/#sctn-sample-registration and call navigator.credentials.create to trigger our USB Security key (our chosen authenticator for this example) shown above, with the help of browser and WebAutn.
We press OK, and we get second image from our key now:
The above image asks for our USB security key pin, which you configured while setting up your key after buying it. With biometric authenticators, and face recognition on iphones, this process is different.
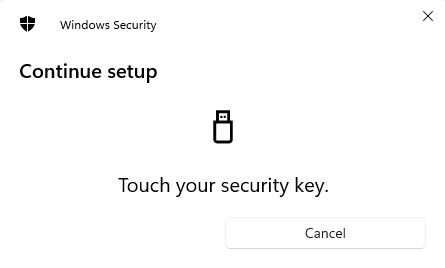
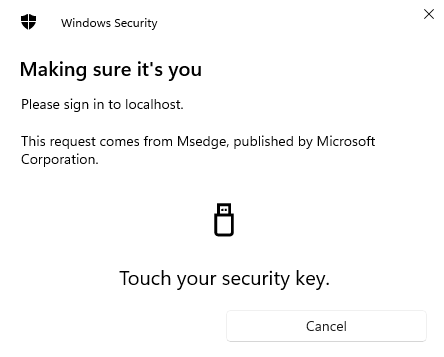
We enter the PIN and press OK. We see this:
The key asks us to touch it. We touch that three umbrella area which lights up. Just touch it, no fingerprints are collected. This is not a fingerprint scanner.
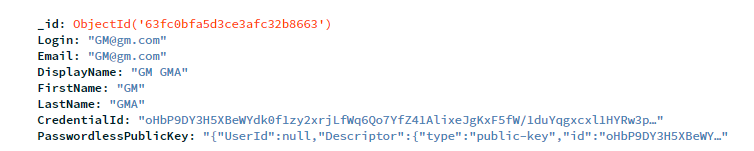
After we touch it, the front end calls registerNewCredential, then it also calls registerCredentialWithServer (front end) and then we call our dotnetcore API SaveCredential method. This method calls fido2.MakeNewCredentialAsync which generates PublicKey, which we can store in our MongoDb. After we store this public key, in addition to First Name, Last Name and an email (username) in our database, we can log in then only with email, and no password required.
For this example, I store this info in database:
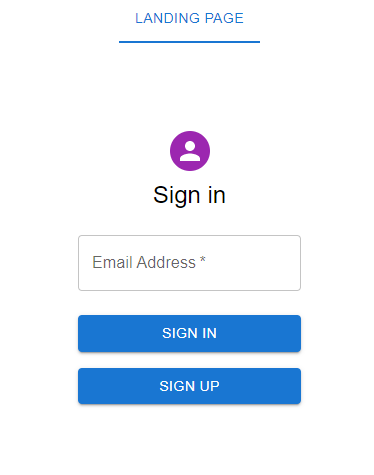
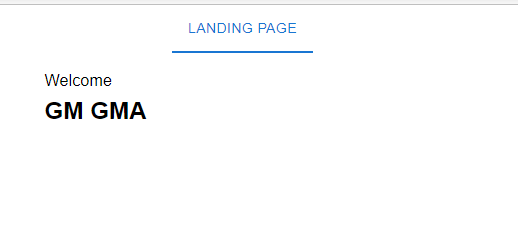
Upon successful registration, we are redirected automatically to SignIn NextJs page:
The sign in process, from above UML Sequence diagram is almost the same. We only use the email address, no password. In the Login method in our API, we ask FIDO2 for assertion options, in order to present them to our authenticator, located right where we are: fido2.GetAssertionOptions.
After we get the assertion options from fido, we call await navigator.credentials.get to trigger our authenticator.
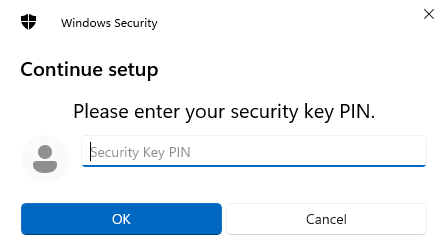
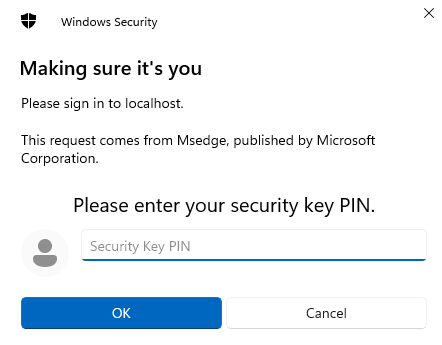
The first window we get is this:
We enter our pin for USB Security key, then it asks us to touch it:
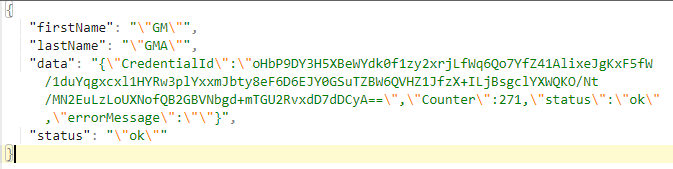
We touch it, and the request goes to MakeAssertion method in our API, but, this time also with our authenticator’s public key. FIDO2 makes its verification, with its internal algorythms ( var result1 = await fido2.MakeAssertionAsync()) and we get a response from the server. This is how response looks like:
We check the status, it should have the value “ok”. This is from FIDO. If “ok”, we put our user in the NextJs state using useState() hook, and show him or her accordingly the info that they are authorized to see.
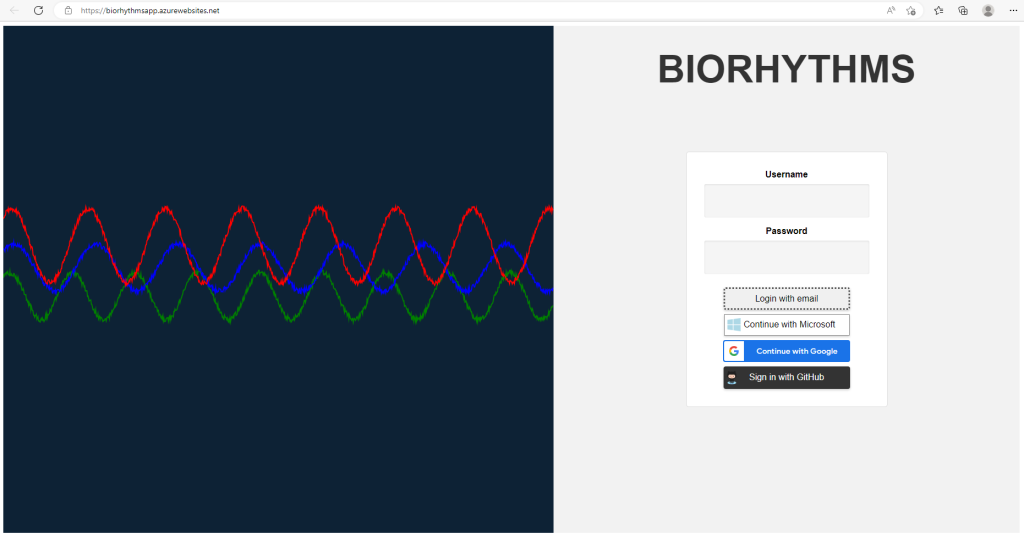
In this post, we are going to create a small ReactJs SPA (Single Page Application) that shows Biorhythms for a person with particular date of birth, and for selected month of his or her choice.
The three buttons below: Microsoft, Google, and GitHub, will allow the user to sign in to our SPA if they have account in any of the mentioned above providers.
Let’s start with GitHub flow, because it requires additional setup.
Before we use the GitHub button, we have to create an application on Github. Navigate to https://github.com/settings/developers and create an app. Save client secret and client secret key. Also add the Homepage URL and Authorization callback URL
We are using react-github-login package, where the authentication flow is handled by the GitHub API,specifically the OAuth 2.0 authentication protocol. This package utilizes the following GitHub API endpoint for authentication: https://github.com/login/oauth/authorize which sends us back “code” or Authorization code. Then we use that code to call our serverless function in Azure to obtain a token : https://biorhythms1234.azurewebsites.net/api/token
Serverless Azure Function
#r "Microsoft.Azure.WebJobs.Extensions.Http"

using System.Net;
using Microsoft.Azure.WebJobs.Extensions.Http;
using Microsoft.AspNetCore.Http;
using Microsoft.AspNetCore.Mvc;

public static async Task<IActionResult> Run(HttpRequest req, ILogger log)
{
    var actokentoreturn = "";
    try
    {
    log.LogInformation("C# HTTP trigger function processed a request.");

    string code = req.Form["code"];

    HttpClient httpClient = new HttpClient();

    var parameters = new FormUrlEncodedContent(new[]
    {
        new KeyValuePair<string, string>("client_id", "f26b2fd9fb46af5e35c8"),
        new KeyValuePair<string, string>("client_secret", "087831a55003b26b914caefcbea583cd92009f59"),
        new KeyValuePair<string, string>("code", code),
    });

    var response = await httpClient.PostAsync("https://github.com/login/oauth/access_token", parameters);

    var content = await response.Content.ReadAsStringAsync();
    var parts = content.Split('&');
    var accessToken = parts[0].Split('=')[1];
    actokentoreturn = accessToken;
    log.LogInformation("The token is: " + actokentoreturn);
    }
    catch(Exception exp)
    {
        log.LogInformation("Exception:" + exp);
    }
    return new OkObjectResult(actokentoreturn);
}
If your Serverless function executes successfully, you should see similar to the below output in the Azure CLI log:
Connected!
2023-03-20T03:18:41Z   [Information]   Executing 'Functions.token' (Reason='This function was programmatically called via the host APIs.', Id=b7056219-4978-45cf-b986-0b7370929643)
2023-03-20T03:18:41Z   [Information]   C# HTTP trigger function processed a request.
2023-03-20T03:18:41Z   [Information]   The token is: 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
2023-03-20T03:18:41Z   [Information]   Executed 'Functions.token' (Succeeded, Id=b7056219-4978-45cf-b986-0b7370929643, Duration=132ms)
After we get the token, we use this token to get the logged in successfully user’s informtion: (getUserDetails function).
getUserDetails function
  //Provided we have the token, this function gets github user details like name and repo URL, among others.
  const getUserDetails = async (authtoken) => {
    const octokit = new Octokit({
      auth: authtoken,
    });

    const { data } = await octokit.users.getAuthenticated();
    // handle user details
    setAuthState({
      isAuthenticated: true,
      user: data.login,
      name: data.url,
      accessToken: null,
      signinprovider: "GitHub",
    });
    setLoggedIn(true);
  };
The button that triggers the internal package flow is:
When the button is clicked, we trigger the login JavaScript’s front end function, because there are node.js functions that run on the back end, but we are not using them in our demo ReactJs SPA app.
We are using Microsoft Azure Active Directory authentication scheme, which is commonly used for Microsoft online services such as Microsoft 365, Azure, and Dynamics CRM, among others.We are using a tenant-independent endpoint, which can be used by any Azure AD tenant to authenticate users with a Microsoft account or an Azure AD account. When a user attempts to log in using this URL, they are directed to the appropriate Azure AD tenant, based on their email domain or the tenant information provided in the request.
We are using the following import:
import { PublicClientApplication } from "@azure/msal-browser";
Then we instanciate an msal instance from above:
 const msalInstance = new PublicClientApplication(msalConfig);
//msalConfig are configuration details. You can find them in the code. They are :
  const msalConfig = {
    auth: {
      clientId: "f01391ee-72aa-4d4a-a90a-00a4fba26bfc",
      authority: "https://login.microsoftonline.com/common",
      redirectUri: "https://biorhythmsapp.azurewebsites.net",
      //redirectUri: "http://localhost:3000",
    },
  };
This code initializes a new instance of the Microsoft Authentication Library (MSAL) with the provided configuration object msalConfig.The PublicClientApplication class is used to create a new instance of MSAL for public client applications, which typically run in a web browser or a mobile app.
Once the msalInstance is created, it can be used to interact with the Azure Active Directory (Azure AD) to authenticate the user and obtain access tokens that can be used to access protected resources such as APIs, on behalf of the user.
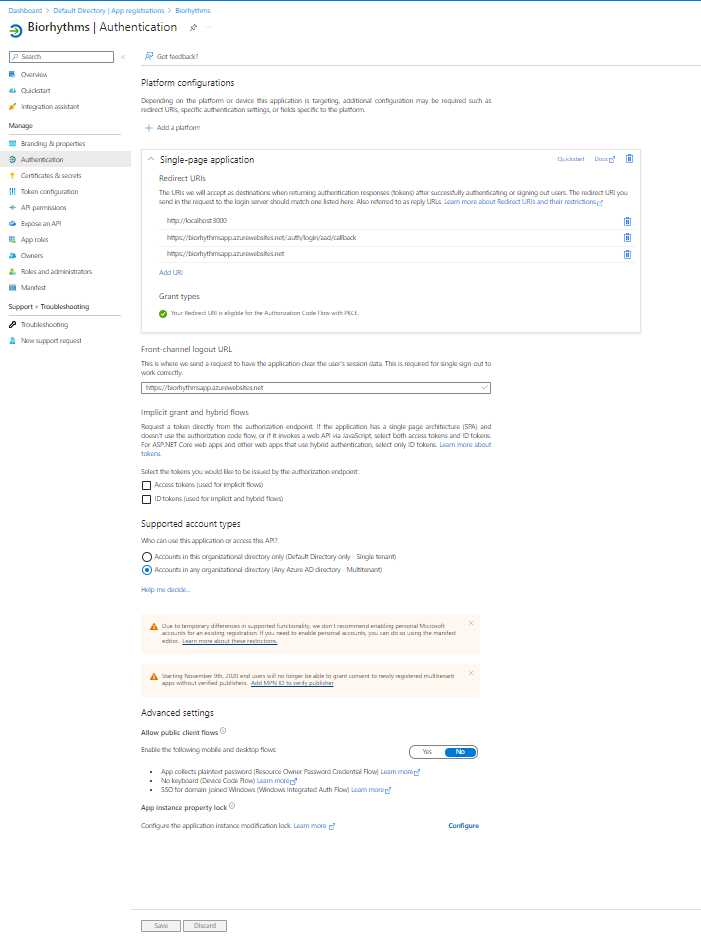
The msalInstance provides a set of methods to handle the authentication flow, such as loginRedirect() and loginPopup(), to get access tokens silently or with a popup window, respectively. You can get the clientID and redirectUri from AppRegistration page in Azure Active Directory. Yes AAD and not AADB2C ! We are not using Azure Active Directory B2C.
Here is how our AppRegistration page looks in Azure Active Directory –> Authentication tab:
After the Microsoft Login button is clicked, login function triggers:
Also, in order for this login function and msal to work correctly, and to avoid CORS errors, by the way, CORS (Cross-Origin Resource Sharing) error is a security feature implemented by web browsers to prevent web pages from making requests to a different domain than the one that served the original page. When a website tries to access resources from a different domain, such as an API, the web browser may block the request and display a CORS error message.
CORS error occurs when a web application running in one domain tries to access resources located in another domain. By default, web browsers restrict such access to protect the user’s data and privacy. To enable cross-domain requests, the server hosting the resources needs to add special headers to the HTTP response, allowing requests from specific origins.
The CORS error message typically includes the following information:
The reason for the error (e.g., Access-Control-Allow-Origin missing)
The URL of the page that made the request
The URL of the resource that was requested
The HTTP response code (e.g., 403 Forbidden, 404 Not Found)
To resolve a CORS error, you can either:
Add the necessary CORS headers to the server-side response to allow cross-origin requests
Use a proxy server (in the GitHUb button example, we created a serverless Azure function that acts like a proxy to the server from whom we need to get a response) to make the request on behalf of the client-side code, bypassing the same-origin policy.
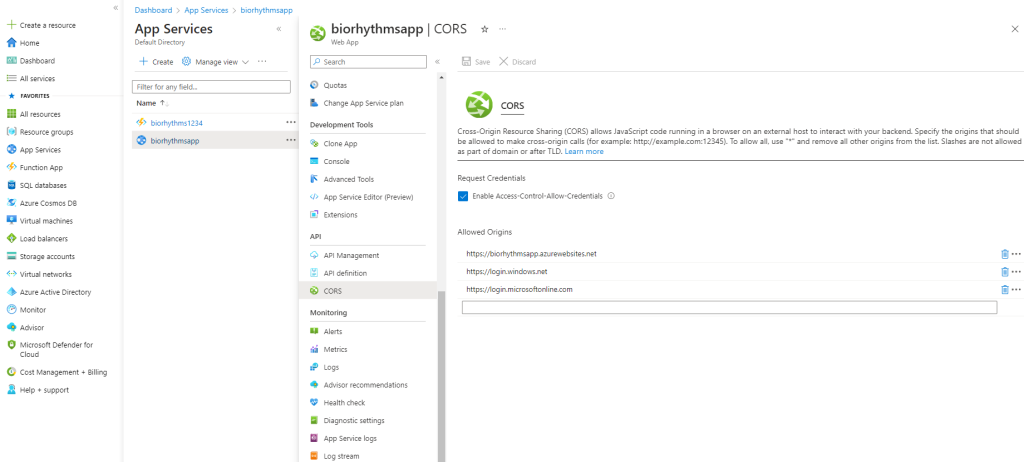
But for Microsoft Login Button functionality it is enough to add the necessary CORS Headers in Azure. After you create your AppService ( described in detail a little down below), click on your AppService (biorhythmsapp in our case) and then under the API secrtion, click on CORS. We should see this page:
Click on “Enable-Access-Control-Allow-Credentials” and add allowed origins. In our case the allowed origins are:
(pkce: true,) above in the code is a security feature introduced in OAuth 2.0 to prevent an attacker from intercepting and using an authorization code that is returned during the authorization flow.
PKCE does this by adding an additional layer of security to the authorization flow, by using a dynamically generated code challenge that is sent along with the authorization request, and a code verifier that is used to validate the code challenge when the authorization code is returned.
By using PKCE, the MSAL library ensures that the authorization code that is returned during the authentication flow can only be used by the intended client application, and cannot be intercepted and used by an attacker.
This helps to protect against certain types of attacks such as man -in -the – middle attacks and token replay attacks.
In order to use Azure AD and register our app there, we need to create our app first locally, and then upload it to Azure. But before uploading, we have to prepare Azure environment first.
Open your Azure Shell and run the following commands:
# Connect to Azure
Connect-AzAccount

# Create a resource group
New-AzResourceGroup -Name "rgbiorhythms" -Location "EastUs"

# Create an App Service plan
New-AzAppServicePlan -Name "biorhythmsserviceplan" -ResourceGroupName "rgbiorhythms" -Location "EastUs" -Tier Free

# Create new web app
New-AzWebApp -ResourceGroupName "rgbiorhythms" -Name "biorhythmsapp" -Location "EastUs" -AppServicePlan "biorhythmsserviceplan"
After we add the necessary code to our current React App, or clone it from my GitHub account : https://github.com/jinan-kordab/asure-authentication , then we need to build it, zip it, and publish it to Azure App Service:
# Build the React App
npm run build

#After that generate zipped file that we will publish to Azure
Compress-Archive -Path "C:\<YOUR PATH TO THE BUILD DIRECTORY GENERATED IN PREVIOUS STEP>\build" -DestinationPath "C:\<ROOT PATHE OF YOUR PROJECT>\build.zip" -Force

#Publish our ReactJs biorhythms app
Publish-AzWebapp -ResourceGroupName "rgbiorhythms" -Name "biorhythmsapp" -ArchivePath ./build.zip
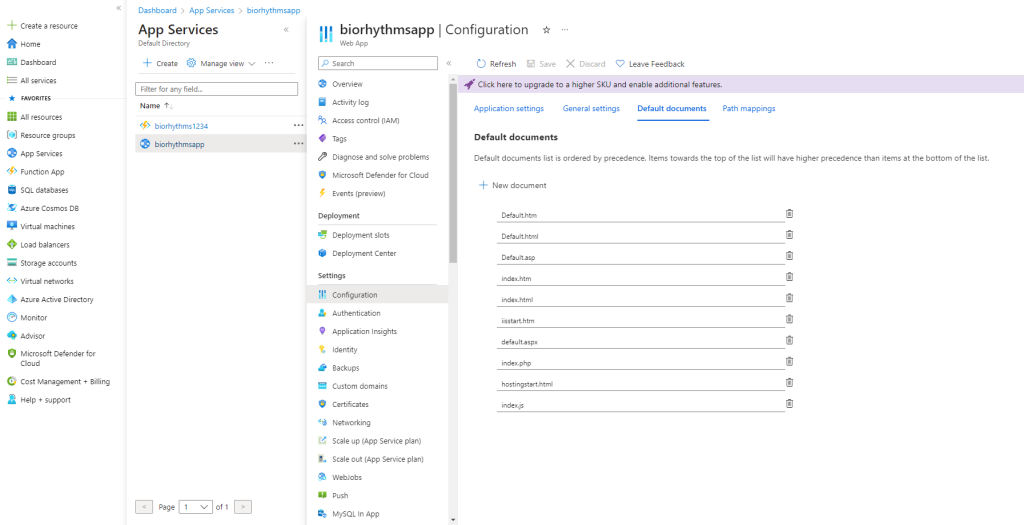
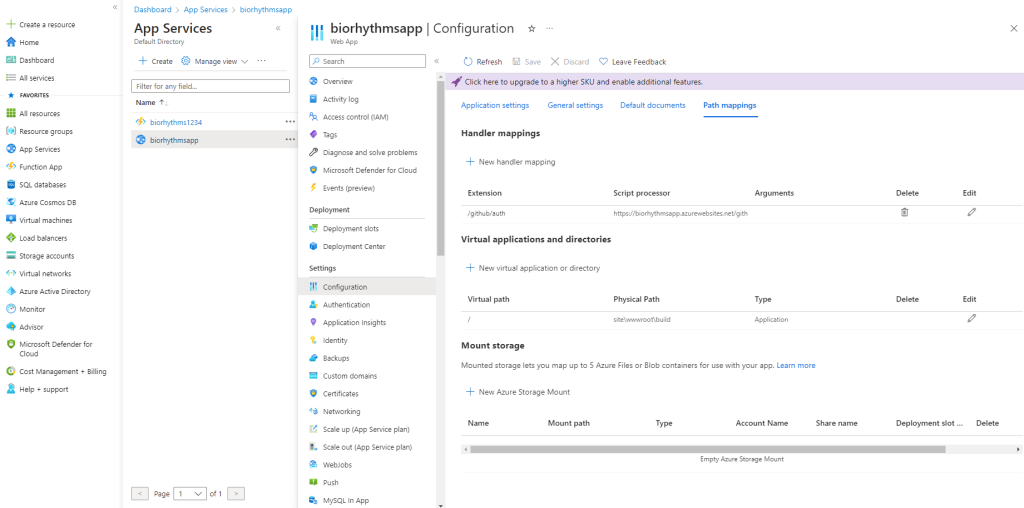
Once the publish is successful, we need to set index.js as default document, and virtual path to: \site\wwwroot\build
The default document and virtual path can be done in Azure by clicking on AppService, then clicking on Configuration:
Google Login Button
Before using Google Button, navigate to https://console.cloud.google.com/ . There create new application, and grab the Client ID and Client secret. Add as well Authorized JavaScript origins, and Authorized redirect URIs.
In order to use Google Login button, we are using @react-oauth/google package from npm. The @react-oauth/google package is a client-side library that provides a React component for implementing a Google login flow in a web application using the OAuth 2.0 protocol.
When using this library, the authentication flow is handled by the Google API, specifically the Google OAuth 2.0 authentication protocol.
This endpoint is used to initiate the OAuth 2.0 authorization flow, which allows the user to grant permission to the application to access their Google account.
Once the user has granted permission, the library uses another Google API endpoint to exchange the authorization code for an access token and a refresh token https://oauth2.googleapis.com/token This endpoint returns a JSON object containing the access token, refresh token, and other details related to the authorization.
The access token returned by this endpoint is a JWT(JSON Web Token)
To decode this token, we use the following import:
import jwt_decode from "jwt-decode";
The jwt_decode is a function, which is a utility library for decoding JSON Web Tokens (JWTs). The decoded JWT token contains information about the user.
In the previous post, we created a FIDO2 and WebAuthn .NET Core WebApi as a separate project (back end) and a separate NextJs project as a front end app in order to log in with no password. The previous two projects ran on localhost. They can be found in this blog post:
In this blog post, we will prepare, and publish the .NET Core part project to Azure.
First of all, we have to store our MongoDb connection string in Azure Vault. We will need to create the following resources in Azure first, and in the following sequence as well. KeyVault will store the secret and the rest is also needed to publish the API and host it in Azure:
Resource Group
AppService Plan
Web App
KeyVault
Create Resource Group:
az group create --name yourchosennamerg --location "EastUs
Create an App Service plan
az appservice plan create --name yourchosenserviceplanname --resource-group yourchosennamerg --sku FREE
Create a Web App
az webapp create --resource-group yourchosennamerg --plan yourchosenserviceplanname --name webappname
Create AzureKeyVault
az keyvault create --name "yourchosenkeyvaultname" --resource-group "yourchosennamerg " --location "EastUs"
Create managed identity
az webapp identity assign --name "yourwebappname" --resource-group "yourchosennamerg "
From the above commands, you will see the following returned:
Grab the principalId and use it to assign the managed identity in order to give your web app permission to do get and list operations on your key vault, pass the principalId to the az keyvault set-policy command:
Assign Managed Identity
az keyvault set-policy --name "yourkeyvaultname" --object-id "990e548b-a928-4f51-8c7e-9k75648h" --secret-permissions get list
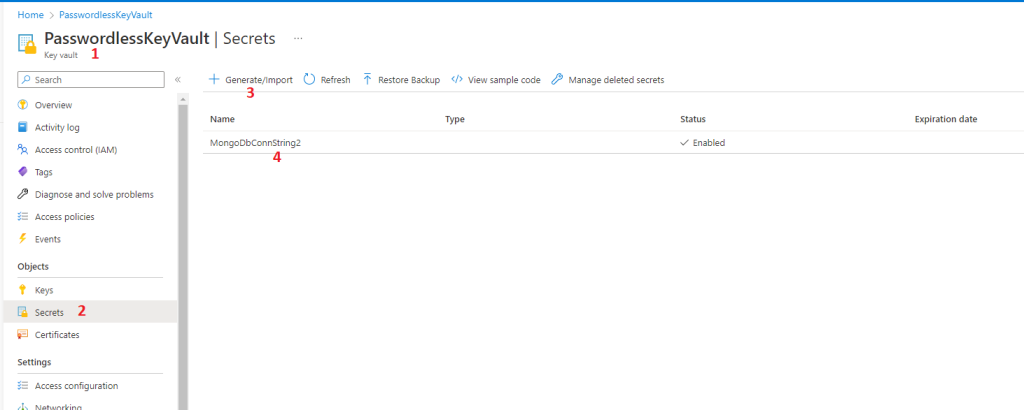
Now either from the code or inside Azure Portal, navigate to newly created KeyVault and add the MongoDb connection string as key value pair:
Alternatively, we can use PowerShell to create all the needed resources above right from command line. Copy the code below all of it into powershell and all the needed resources will be created:
#Connect to your Azure subscription if you are not already connected
Connect-AzAccount

# Create a resource group
New-AzResourceGroup -Name "rgpasswordless" -Location "EastUs"

# Create an App Service plan
New-AzAppServicePlan -Name "passwordlessserviceplan" -ResourceGroupName "rgpasswordless" -Location "EastUs" -Tier Free

# Create a web app
New-AzWebApp -ResourceGroupName "rgpasswordless" -AppServicePlan "passwordlessserviceplan" -Name "passwordlessapicorenext"

# Create a key vault
New-AzKeyVault -Name "PasswordlessKeyVault" -ResourceGroupName "rgpasswordless" -Location "EastUs"

# Assign a managed identity to the web app
Set-AzWebApp -AssignIdentity $true -Name "passwordlessapicorenext" -ResourceGroupName "rgpasswordless"

#Get PrincipalID
$principalId = (az webapp identity show --name "passwordlessapicorenext" --resource-group "rgpasswordless" | ConvertFrom-Json).principalId

#Set keyvaule access policy
Set-AzKeyVaultAccessPolicy -VaultName "PasswordlessKeyVault" -ObjectId $principalId -PermissionsToSecrets get,list

#Set the required secret in keyvault
$secretValue = ConvertTo-SecureString -String "YOURMONGODBCONNECTIONSTRING" -AsPlainText -Force
Set-AzKeyVaultSecret -VaultName "PasswordlessKeyVault" -Name "MongoDbConnString2" -SecretValue $secretValue
In the solution itself, and in terminal, bash or powershell, run the following commands to add the references to the API project in order to use KeyVault itself:
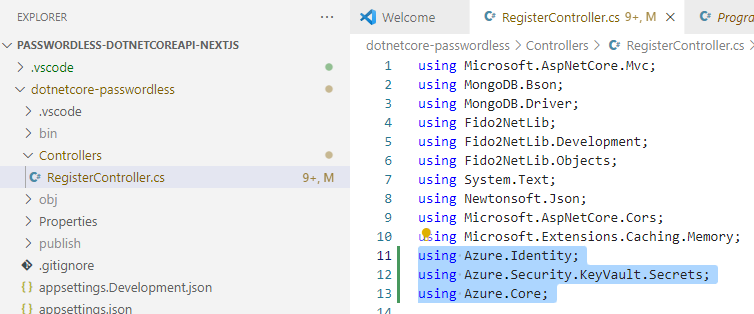
Then at the top of RegisterController, add using statements
using Azure.Identity;
using Azure.Security.KeyVault.Secrets;
using Azure.Core;
After this we can use the following code block to replace the MongoDb connection string with Azure Key Vault secret, which is considered as a global variable in Azure. We can also write a helper method or database access layer in our API and add this code once. For the purpose of this demo, I put all the code in a single file.
SecretClientOptions options = new SecretClientOptions()
    {
        Retry =
        {
            Delay= TimeSpan.FromSeconds(2),
            MaxDelay = TimeSpan.FromSeconds(16),
            MaxRetries = 5,
            Mode = RetryMode.Exponential
         }
    };
var client = new SecretClient(new Uri("https://PasswordlessKeyVault.vault.azure.net/"), new DefaultAzureCredential(),options);

KeyVaultSecret secret = client.GetSecret("MongoDbConnString2");

string secretValue = secret.Value;
The next step is to switch to our terminal inside VSCode and publish our API locally:
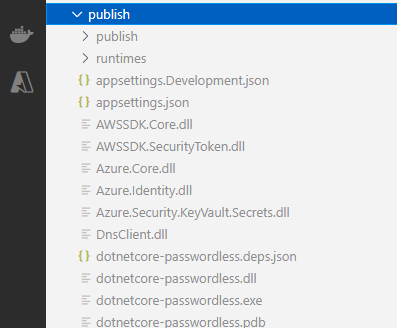
dotnet publish -c Release -o ./publish
This will create a publish directory inside our API. Then, right click on the publish folder and navigate to Deploy To Web App
In the output tab of bottm panel in VSCode you will see these lines at the end of deployment:
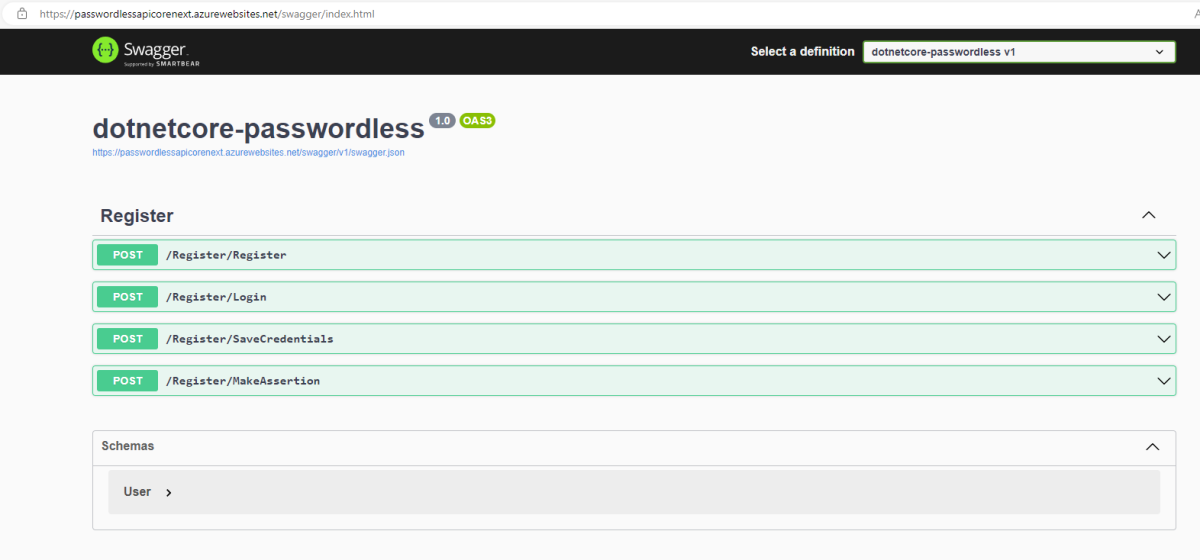
Then, navigate to your Azure Portal, and to your subscription ofcourse, then click on your WebApp and copy the Default Domain value. In my case it is: passwordlessapicorenext.azurewebsites.net
Click enter and you should be able to see the swagger page with available API endpoints:
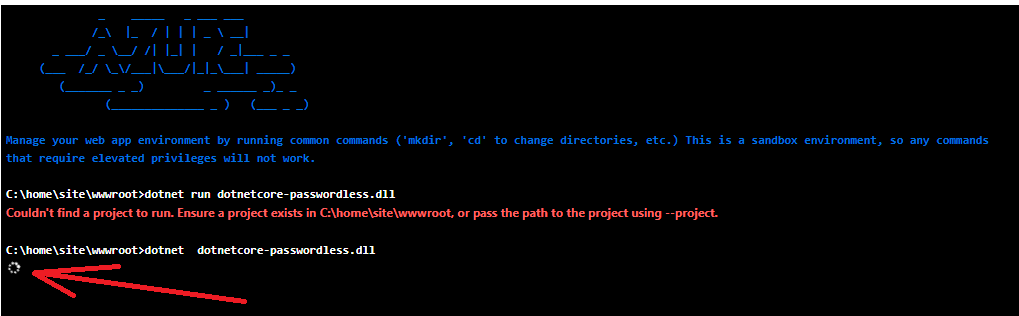
If you get 500.30 In-Process Startup Failure error open console inside your WebApp as below:
When the console opens, type:
dotnet dotnetcore-passwordless.dll
The name of the dll you can find it in publish directory locally when we published the API locally:
If everything is ok, you should see turning circle that never stops. Most of the startup errors should appear here in console, very detailed:
Another way to deploy this API would be by packaging everything to Acure Container Registry and adding our image to Azure Container Instance with the help of Docker.
In my humble understanding, I think that the evolution of UX UI throughout history the way we see it today in software happened because of three or even four factors:
Industrial revolution
Newspaper industry
Paintings ( form of art )
You might argue that everything in software evolved from those things. But if this is the case, why only in recent years that we started to see something like Full Stack Engineers, UX UI designer ? If everything in software evolved from those three things. Oh, I forgot to add a fourth dimension:
Visual perception ( how our eyes see the world and what they like )
So if everything evolved from those four factors, then why first computers and computer programs were not visual and screen based ? First programs were plain instructions to a computer to perform complex calculations, that is all.
No, it is not a history of software or UX UI article, nor it is a philosophical debate.
I just want to make a point that when designing UX UI screen, we focus on those four factors mentioned above, but translated in different words:
Control panel items like buttons, labels, handles, switches ( on and off ) that were used in operating a mechanical machine ( industrial revolution )
Menu bars, headers and footers, and side bars including titles and navigation menus ( Newspaper industry )
Colors, font thickness, boldness, blurriness, styles ( paintings or form of art )
Night vision, 2D, 3D, stereoscopic visual design like 3D movies or 3D stereoscopic websites where you need special eyeglasses to look at. Flexibility of components on the page, or flex.( Visual Perception )
That being said, I think considering all those factors above when designing a UX UI screens, SPAs or landing pages, one can be proud of their design from whichever angle you look at it, design wise or functionality wise.
Aren’t we always trying to enhance UX UI ?
There is also a reason why many always use both abbreviations together UX UI when referring to a user interface and front end design. I think it is because in software one cannot separate a good UI design from functionality that it provides because if only saying UI then it would simply be a digital painting, and nothing more.
Here is an image of a confusing UI UX design:
Small machine with controls that play recorded message to the tourists.
As shiny as it may look, the image above, in my own opinion, let me stop beside it and ponder 3 to 4 minutes, just looking at it, with an open mind. First few seconds I thought it is a stereoscopic image. But it is not.
If you look at it closely, and it is attractive in its own way, you will understand that it is a machine that plays a recording to a tourist about the cultural destination that he or she is at right now, with historical info, etc… in both languages, French and English. There is also French volume slider up and down and English slider.
My mind got confused, although I understood the general idea.But don’t you think if we removed one of the volume sliders, and put the other in the center, and then the two language buttons make them bigger and put them on left and right of the volume, that it would be less confusing? Something like this:
Upper image edited
Also, I stumbled across an elevator that has two doors, and a control panel between the doors. Some of the control panel items are very tightly squeezed right beside the doors themselves. I used those elevators and I do not remember which button of them I pressed to call the elevator . I think I pressed them all. Take a look:
Elevator control panel
Ten buttons ! Three of them, I think , are “key” buttons. Looks like people who made this control panel adored buttons.
By the way, I always thought that standard buttons to force close or force open elevator doors once you are inside also should be redesigned, because they are always confusing to me and each time I spend some time trying to figure with which button to force close the elevator door from inside.
By the way, the elevator control panel above is in a mall with many many visitors each day in a very famous place.
So one might think that too much of a buttons on a screen is confusing and only one button for everything is , well, kind of weird too, and that there must be a middle way, in between the two extremes.
That is not necessary true. Because there is also a depth, or a Z axis to this.,which has to do with our visual perception and comprehension of how we do things on that panel. Meaning that a button does not have to be directly responsible for one and only one action and it may need to be pressed at the same time with another button to mean something.
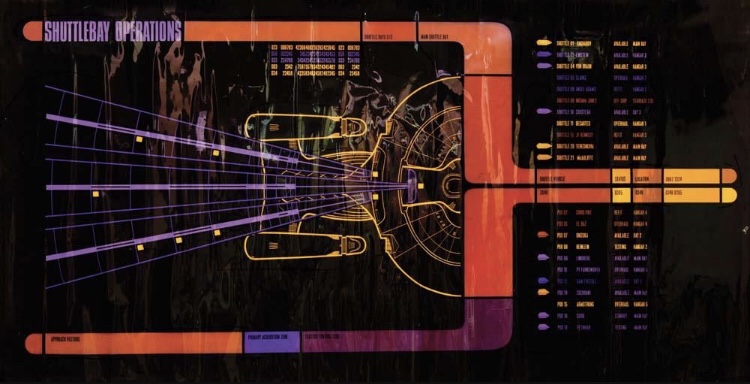
Have you ever a seen a control panel from Star Trek spaceship ? Here is an example:
Star Trek control panel. Source: Google Images
There are a lot of buttons above, for example, but the person operating this control panel has to pass training first because sometimes it is needed to press two buttons with two fingers simultaneously, like when you press two pedals in a manual transmission car. Of course this user interface is harder to design, and it needs to target specific audience.
To summarize, I think UX UI design is simple, as long as we design it that way, and with Component based approach to UX UI design such as React and NextJS, our creativity and acceptance of what we design will increase.
Cypress is an amazing relatively new tool to test everything that runs in a browser.
End to end, as I understand it, means all operations that any user of our site or app that runs in a browser can perform.
Example of operations are: Logging in, signing in, getting the needed information, creating new information, updating existing information, and deleting desired info.
All of the actions above are called CRUD operations. ( Create, Read, Update, Delete ) that users perform on our site or app that runs in tune ( gladly and hopefully responsively) with all industry most widely used browsers.
Did we miss something ? Well, I think yes and no. For example, our app can also send emails, call other programs, wait and listen for incoming notifications, and send push notifications on its own, with no user interference.
Not to mix things up, we can classify the above actions into further different tests, unit and integration tests.
Example: Sending an email will fall under unit tests, we can call this test “Send Email Test” and we will only and only test the “actual” sending of an email, without it being affiliated or associated in any way with any other action that a user,or our app performs.
When an email is sent upon completion of some user’s or app’s action, we will categorize this under Integration Tests, because the sending of an email is integrated, related, and based on another action, which in turn calls our “Send Email” functionality. So we can create a new integration test and call it “ Send email on log in”.
So as you can see, with this simple approach, we have identified already three different kinds of tests that we can courageously create in Cypress.io and thankfully cypress can do all that. It is very versatile, fast and easy to grasp, learn, and use.
I have written a small NodeJs-RethinkDB app for myself to write recipes. Cypress “recipes” is a philosophy around tests that you write. You can add a little bit of pepper, salt, make assertions for some actions to be true or false, and predict the future of your test a little bit, then run the test and check the results.
Personally I like writing basic recipes, that fit all tastes, more or less. Because they do fit all tastes, and everyone likes them.
You can do whatever you want with this app, but please do not delete it because I need it, like I said before. :)))))
This app is pure NodeJs app and has a RethinkDb as a backend for storing organic foods information. The reason I chose RethinkDb is because it has something called “changefeeds”. When changefeeds are enabled in our app, with the help of socket.io, RethinkDb sends us notifications upon some changes in its table data that we specify.
Let’s say we want to receive a notification once a user updates a table in our database. RethinkDb will listen by itself for any changes that occur on that table, and send our app a notification. Inside our app, we will use socket.io to emit or push this notification to any of our front end pages written with EJS templates.
All this functionality is inside the app mentioned above, with Admin front end EJS page that accepts those notifications.
That being said, I think we can safely categorize the above changefeeds under End to End tests, because this functionality is a result of a user interfering with our tables. But, I am more inclined towards putting it under Integration Tests folder, because RethinkDb changefeeds functionality is integrated with user’s CRUD operation, and can not be tested separately as a unit test on its own. Why ? Because if we ask ourselves a question “How do we invoke a RethinkDB changefeed?” , The answer is : “We need to make some changes in our database”. Therefore we have a CRUD operation. But you may argue and say that what if the user does not invoke the CRUDE operation and it was invoked by another function call or another Promise in our app. Then and only then I would safely say that we need to put it under integration tests folder. Thus, for this example, I added it as E2E test.
Please find below the Admin cypress.io page that contains the E2E test for our changefeeds, relying on socket.io.
This file contains bidirectional Unicode text that may be interpreted or compiled differently than what appears below. To review, open the file in an editor that reveals hidden Unicode characters.
Learn more about bidirectional Unicode characters
Lite Scrum is available in both languages, French and English.
If you took a look at the Image gallery above, and the two videos, History of Agile and Evolution of Scrum and Use Case Scenario using Lite Scrum, you have already formed an idea of what is Lite Scrum.
I wrote Lite Scrum for myself, to help me do work faster, more organized, with no distractions,thus saving time and increasing hyperproductivity. A good definition of Hyperproductivity I found interesting on Peter Bendor-Samuel’s blog post here:
The hyperproductivity model delivering a 350-1,000% improvement in productivity is an order of magnitude improvement.
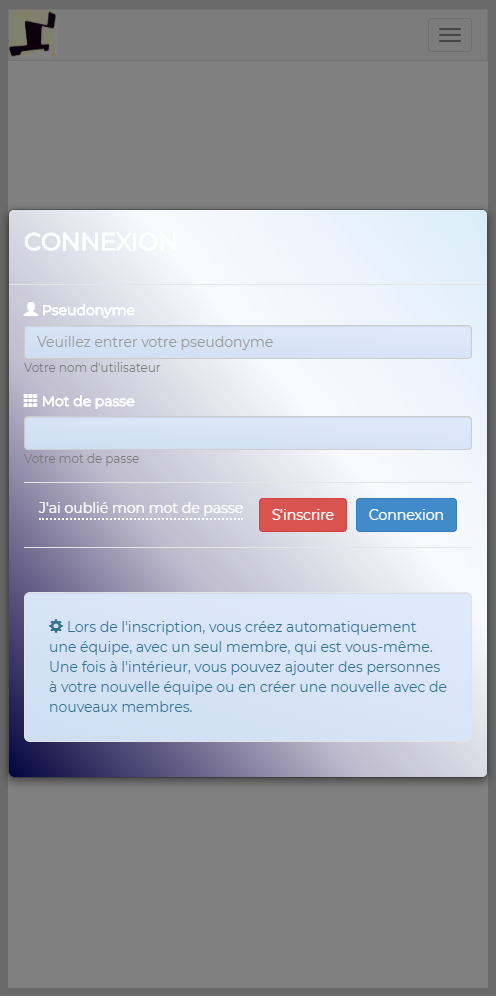
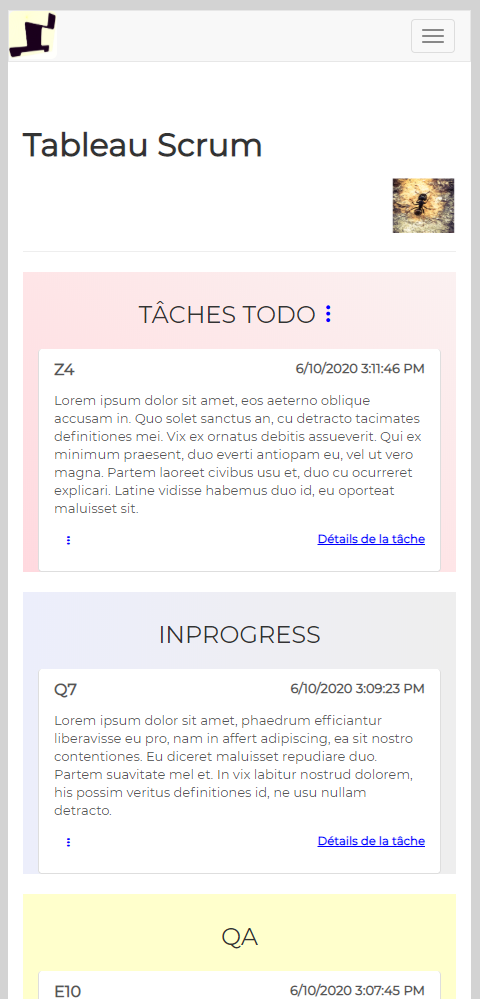
Lite Scrum is a software I wrote, that can be opened using all modern web browser like Firefox, Chrome, Edge, and Internet Explorer.
It can be used on mobile devices and smart phones, like Apple IPhone and Android by navigating to : lite-scrum
Me, I use it for Sofware Development, since I am a Software Developer myself, but it can be used in any industry: Cars, Weddings, Catering, Planning, Small Business Shops etc . . .
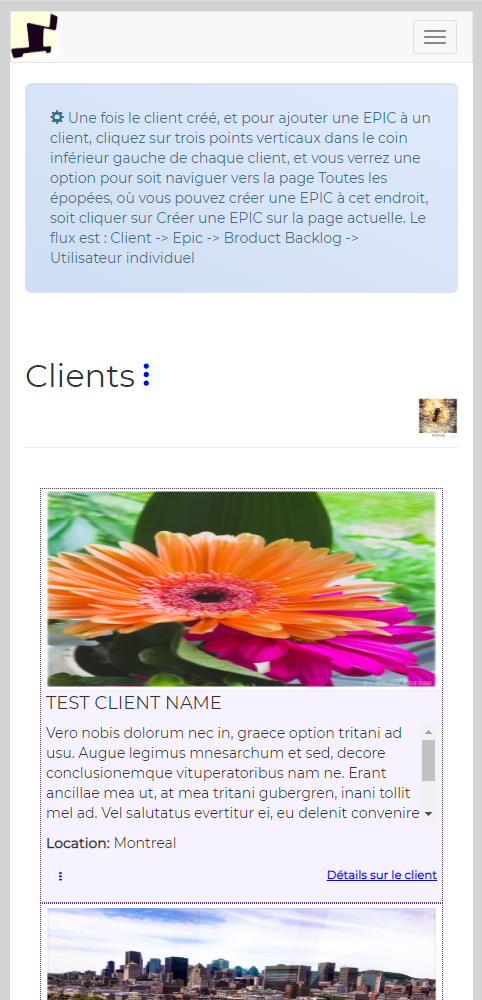
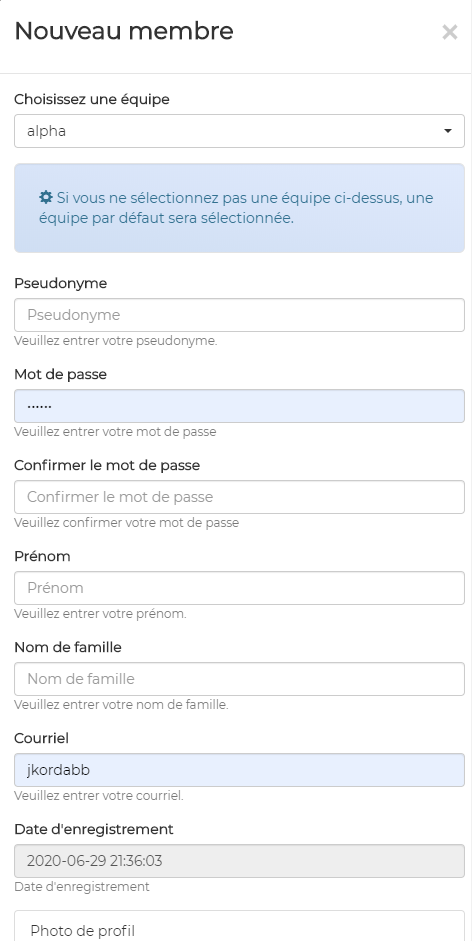
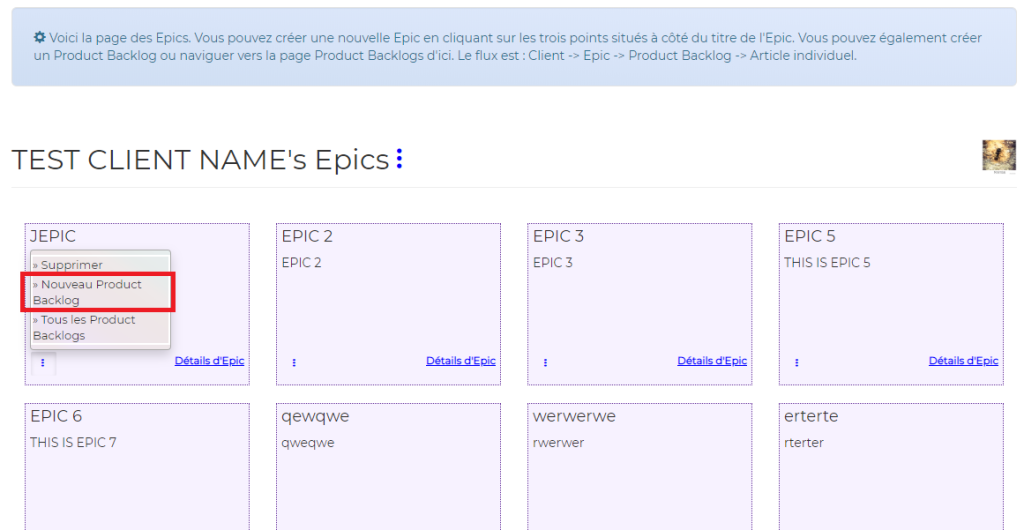
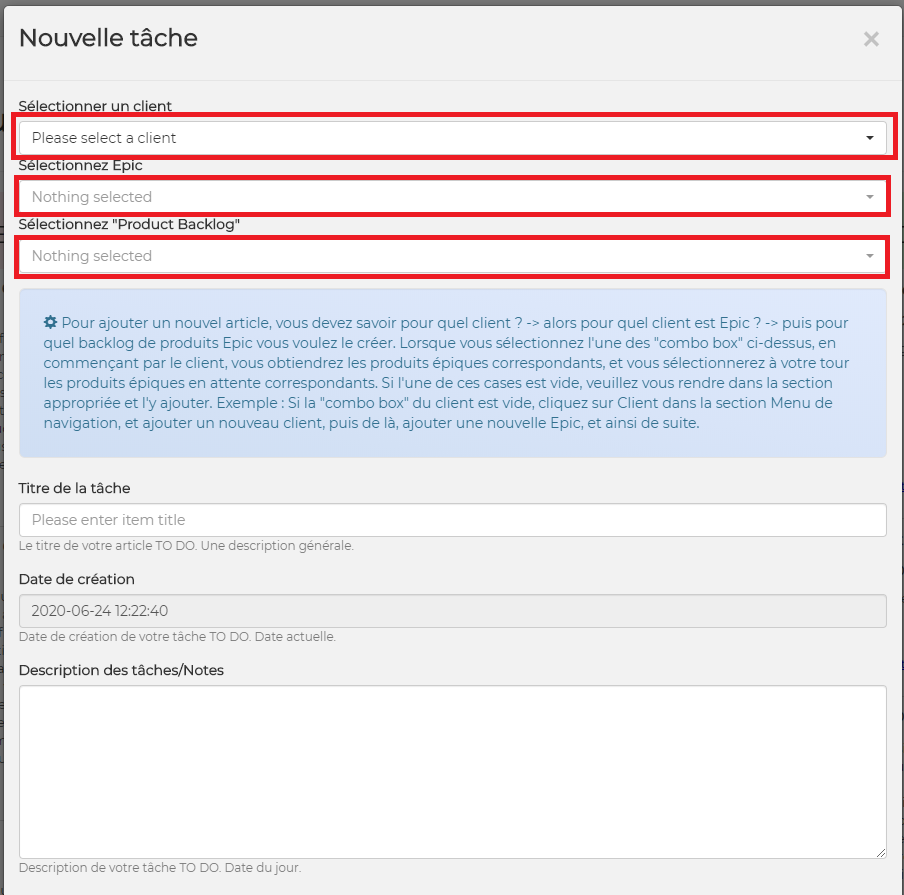
It uses its own flow, and I derived this flow from Scrum Principles itself, to simplify work for myself and who ever uses it. Its flow uses four objects: CLIENT, EPIC, PRODUCT BACKLOG and TASK. You may have seen those icons below in the slideshow above:
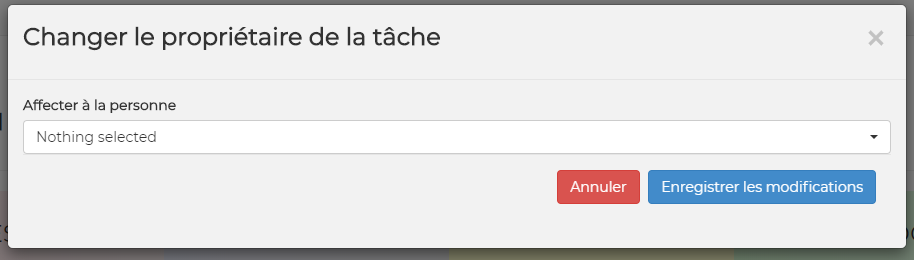
In other words, in order to create a task or tasks, assign them to someone and start working, we need to create Client first, then create Epic or Epics for that client, then create Product Backlog or Product Backlogs for that client, then create a task or tasks.
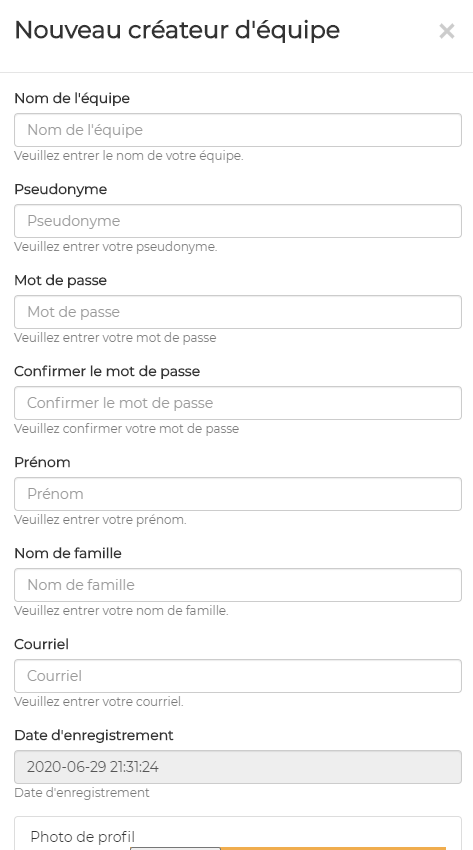
Lite Scrum best works with teams four to five people, and you can have as many teams as you want.
I have added a short presentation I made to show what is Lite Scrum, that way it is easier to understand with short, straight to the point sentences, that our mind can catch, without long introductions:
The picture below shows how Lite Scrum logo came up to be:
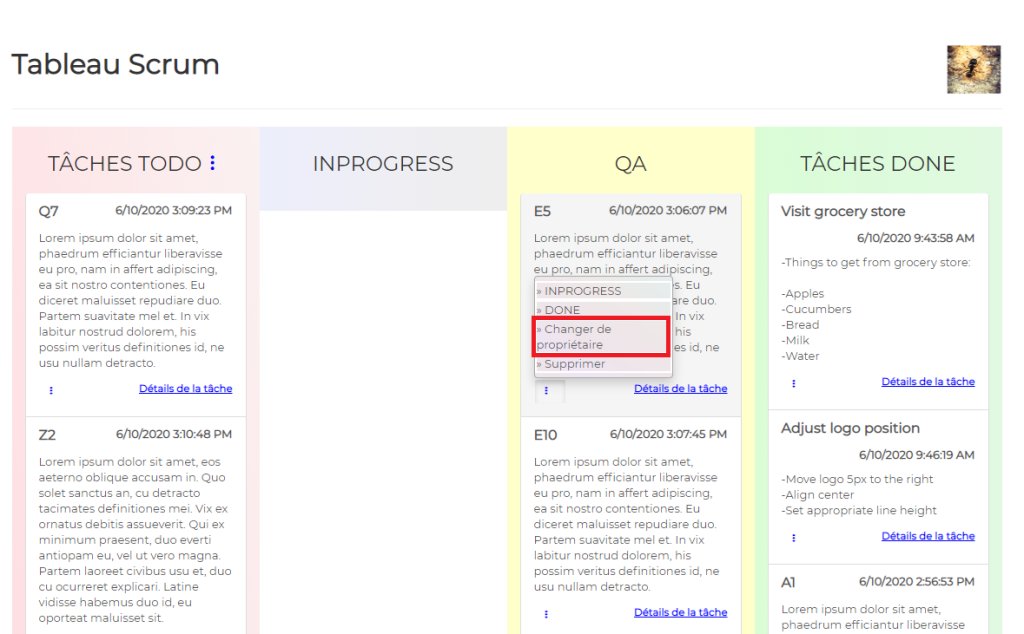
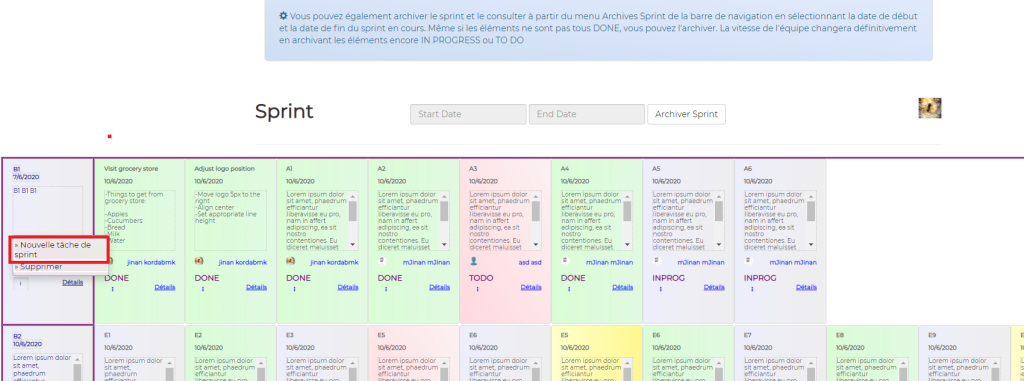
The circled person’s C tasks on General Scrum (Sprint) Board came up to be the logo. Eventually the circled tasks in the image above become indivisual’s person’s landing page items to work on.
Lite Scrum is built with Responsive Design in mind, so it is available on all browsers, and cross-platform, meaning it has a nice look and feel on PC, MAC, Tablets, and Smartphones
Lite Scrum is free to test, try, and use. It is also available for hosting On Premises.
I have compiled a simple javascript code block, as shown below, to print separate sections of your web page, by just passing the id of the div that you want to print. Below is a code snippet from my GitHub
This file contains bidirectional Unicode text that may be interpreted or compiled differently than what appears below. To review, open the file in an editor that reveals hidden Unicode characters.
Learn more about bidirectional Unicode characters
Sometimes we need drag and drop functionality on websites. Maybe we need to drag one element into another element, or just reorder something just by dragging.
I researched a lot of libraries open source available online, and came to conclusion that JQuery library for Draggable and Droppable is the best so far. Because its methods are very simple, or event handlers for drag and drop. Besides, many other libraries build on top of this JQuery library.
Also because it is very simple to use and implement.
Here is the source code for the HTML page I created. video follows it:
This file contains bidirectional Unicode text that may be interpreted or compiled differently than what appears below. To review, open the file in an editor that reveals hidden Unicode characters.
Learn more about bidirectional Unicode characters
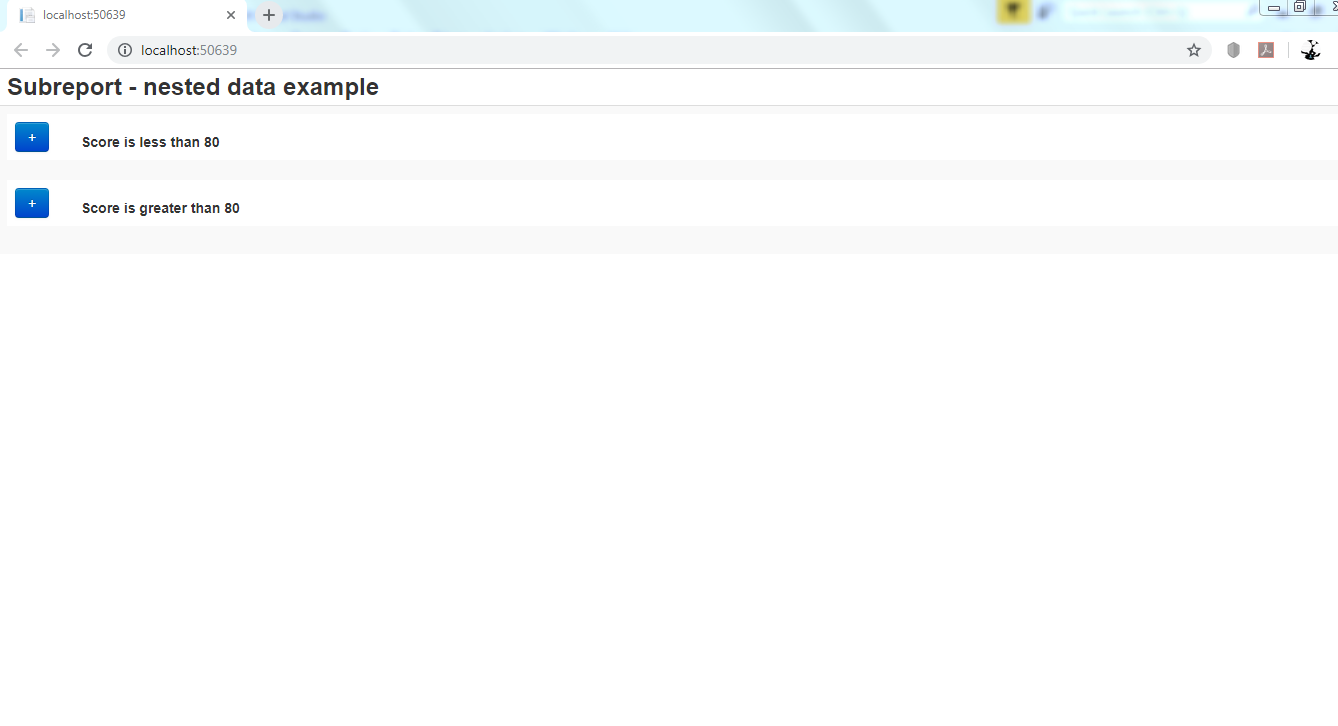
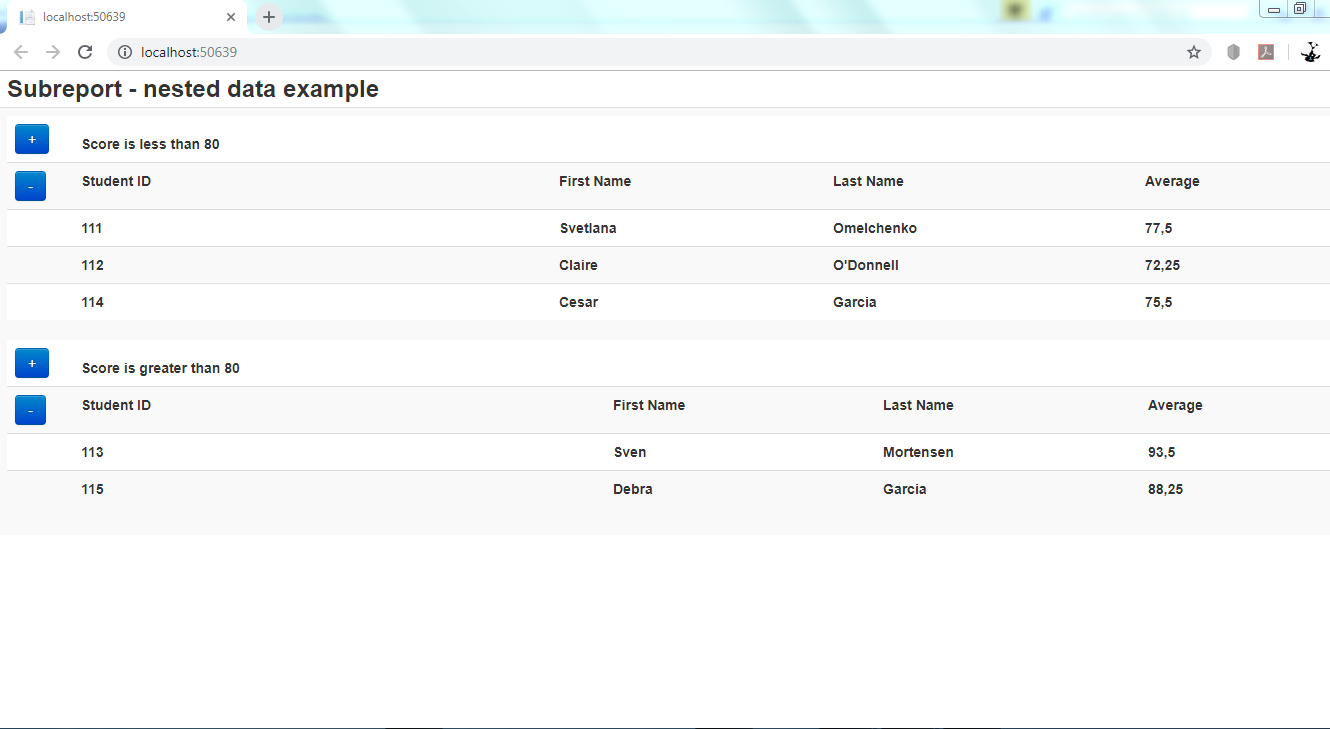
In this blog post I will display data within another data. Or, report within sub-report. Sometimes we need this functionality to display details of a particular object, on the same web page without navigating somewhere else.
We will need the following JavaScript files:
This file contains bidirectional Unicode text that may be interpreted or compiled differently than what appears below. To review, open the file in an editor that reveals hidden Unicode characters.
Learn more about bidirectional Unicode characters
First, create ASP.NET MVC Solution in Visual Studio 2017, and add the following code in Home Controller:
This file contains bidirectional Unicode text that may be interpreted or compiled differently than what appears below. To review, open the file in an editor that reveals hidden Unicode characters.
Learn more about bidirectional Unicode characters
In the code above we fill the View Bag with students list to pass to the View with this line of code:
ViewBag.StudentList = stuentList;
Then we call the view below:
This file contains bidirectional Unicode text that may be interpreted or compiled differently than what appears below. To review, open the file in an editor that reveals hidden Unicode characters.
Learn more about bidirectional Unicode characters
FogBugz is an integrated web-based project management system featuring bug and issue tracking, discussion forums, wikis, customer relationship management, and evidence-based scheduling originally developed by Fog Creek Software. source: Wikipedia
When you work on your project, and in order for FugBugz to track your changes, please follow these steps to configure your Working Copy of Subversion to interact with FogBugz.
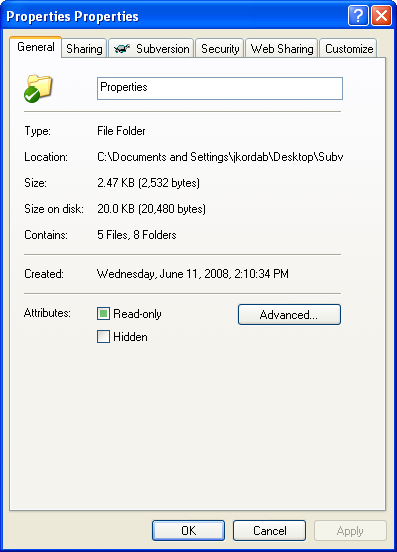
After you have installed TortoiseSVN, created your working copy folder /directory, and checked out the needed files (Visual Studio Solution, Visual Studio Projects, pictures, binary files etc..), right click inside the same directory/folder, go to properties, where you will see the following form:
Navigate to Subversion TAB as shown below:
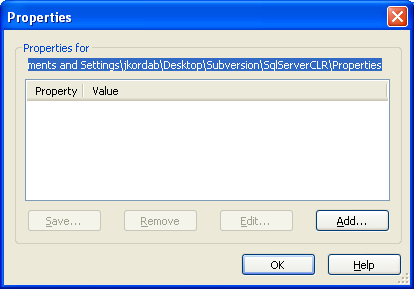
Click on Properties, where you will see the following form:
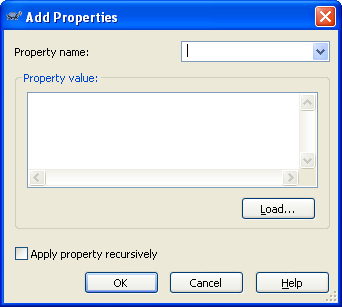
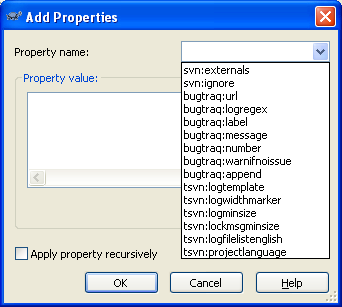
Click Add button, and the Add Properties Form will appear as shown below:
Click on Property name Combo Box, where you will see different Subversion Properties. The following steps will involve adding these properties.
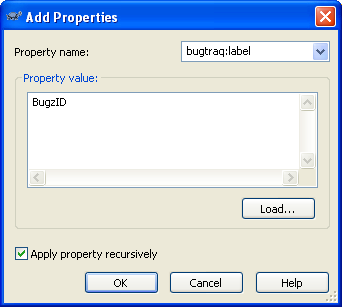
Select bugtraq:label property
In the Property value field, type BugzID
Check the “Apply property recursively” checkbox as shown below, and click ok.
Once you’ve added all the required properties, you will see something like this:
Click Ok button and you’re done.
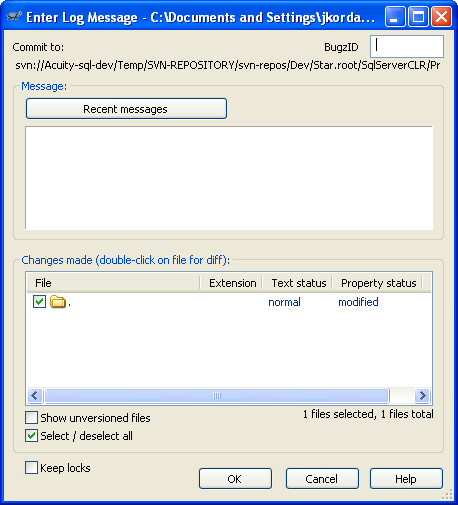
To test all this, stay in your current working copy folder, right click à SvnCommit à and you should see the following form (Notice the label BugzID and bound textbox)
If you do not see the BugzID textbox, try to do the previous steps again. Be sure to type the properties values exactly as specified.