In the previous post, we created a FIDO2 and WebAuthn .NET Core WebApi as a separate project (back end) and a separate NextJs project as a front end app in order to log in with no password. The previous two projects ran on localhost. They can be found in this blog post:
In this blog post, we will prepare, and publish the .NET Core part project to Azure.
First of all, we have to store our MongoDb connection string in Azure Vault. We will need to create the following resources in Azure first, and in the following sequence as well. KeyVault will store the secret and the rest is also needed to publish the API and host it in Azure:
Resource Group
AppService Plan
Web App
KeyVault
Create Resource Group:
az group create --name yourchosennamerg --location "EastUs
Create an App Service plan
az appservice plan create --name yourchosenserviceplanname --resource-group yourchosennamerg --sku FREE
Create a Web App
az webapp create --resource-group yourchosennamerg --plan yourchosenserviceplanname --name webappname
Create AzureKeyVault
az keyvault create --name "yourchosenkeyvaultname" --resource-group "yourchosennamerg " --location "EastUs"
Create managed identity
az webapp identity assign --name "yourwebappname" --resource-group "yourchosennamerg "
From the above commands, you will see the following returned:
Grab the principalId and use it to assign the managed identity in order to give your web app permission to do get and list operations on your key vault, pass the principalId to the az keyvault set-policy command:
Assign Managed Identity
az keyvault set-policy --name "yourkeyvaultname" --object-id "990e548b-a928-4f51-8c7e-9k75648h" --secret-permissions get list
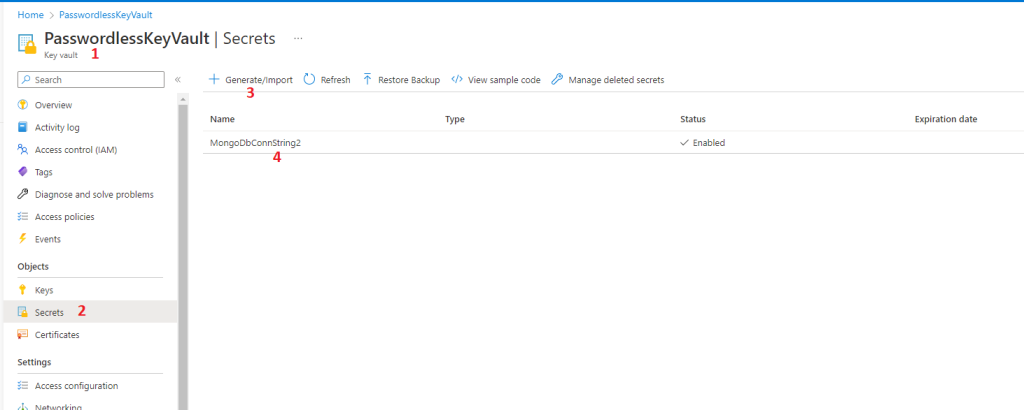
Now either from the code or inside Azure Portal, navigate to newly created KeyVault and add the MongoDb connection string as key value pair:
Alternatively, we can use PowerShell to create all the needed resources above right from command line. Copy the code below all of it into powershell and all the needed resources will be created:
#Connect to your Azure subscription if you are not already connected
Connect-AzAccount

# Create a resource group
New-AzResourceGroup -Name "rgpasswordless" -Location "EastUs"

# Create an App Service plan
New-AzAppServicePlan -Name "passwordlessserviceplan" -ResourceGroupName "rgpasswordless" -Location "EastUs" -Tier Free

# Create a web app
New-AzWebApp -ResourceGroupName "rgpasswordless" -AppServicePlan "passwordlessserviceplan" -Name "passwordlessapicorenext"

# Create a key vault
New-AzKeyVault -Name "PasswordlessKeyVault" -ResourceGroupName "rgpasswordless" -Location "EastUs"

# Assign a managed identity to the web app
Set-AzWebApp -AssignIdentity $true -Name "passwordlessapicorenext" -ResourceGroupName "rgpasswordless"

#Get PrincipalID
$principalId = (az webapp identity show --name "passwordlessapicorenext" --resource-group "rgpasswordless" | ConvertFrom-Json).principalId

#Set keyvaule access policy
Set-AzKeyVaultAccessPolicy -VaultName "PasswordlessKeyVault" -ObjectId $principalId -PermissionsToSecrets get,list

#Set the required secret in keyvault
$secretValue = ConvertTo-SecureString -String "YOURMONGODBCONNECTIONSTRING" -AsPlainText -Force
Set-AzKeyVaultSecret -VaultName "PasswordlessKeyVault" -Name "MongoDbConnString2" -SecretValue $secretValue
In the solution itself, and in terminal, bash or powershell, run the following commands to add the references to the API project in order to use KeyVault itself:
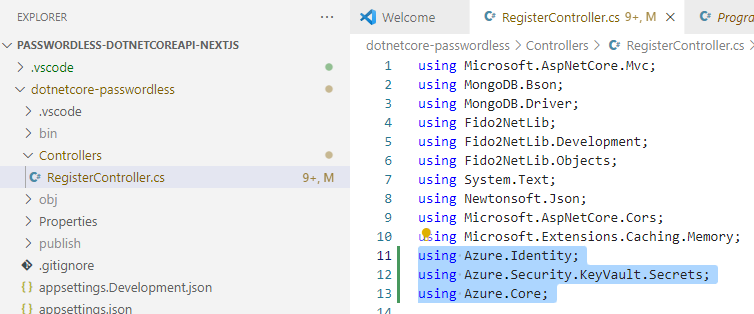
Then at the top of RegisterController, add using statements
using Azure.Identity;
using Azure.Security.KeyVault.Secrets;
using Azure.Core;
After this we can use the following code block to replace the MongoDb connection string with Azure Key Vault secret, which is considered as a global variable in Azure. We can also write a helper method or database access layer in our API and add this code once. For the purpose of this demo, I put all the code in a single file.
SecretClientOptions options = new SecretClientOptions()
    {
        Retry =
        {
            Delay= TimeSpan.FromSeconds(2),
            MaxDelay = TimeSpan.FromSeconds(16),
            MaxRetries = 5,
            Mode = RetryMode.Exponential
         }
    };
var client = new SecretClient(new Uri("https://PasswordlessKeyVault.vault.azure.net/"), new DefaultAzureCredential(),options);

KeyVaultSecret secret = client.GetSecret("MongoDbConnString2");

string secretValue = secret.Value;
The next step is to switch to our terminal inside VSCode and publish our API locally:
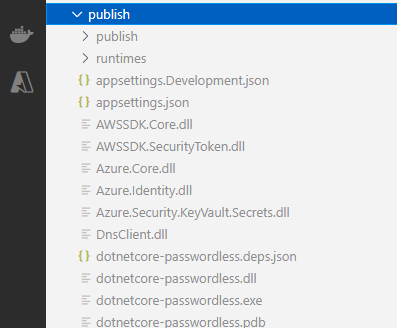
dotnet publish -c Release -o ./publish
This will create a publish directory inside our API. Then, right click on the publish folder and navigate to Deploy To Web App
In the output tab of bottm panel in VSCode you will see these lines at the end of deployment:
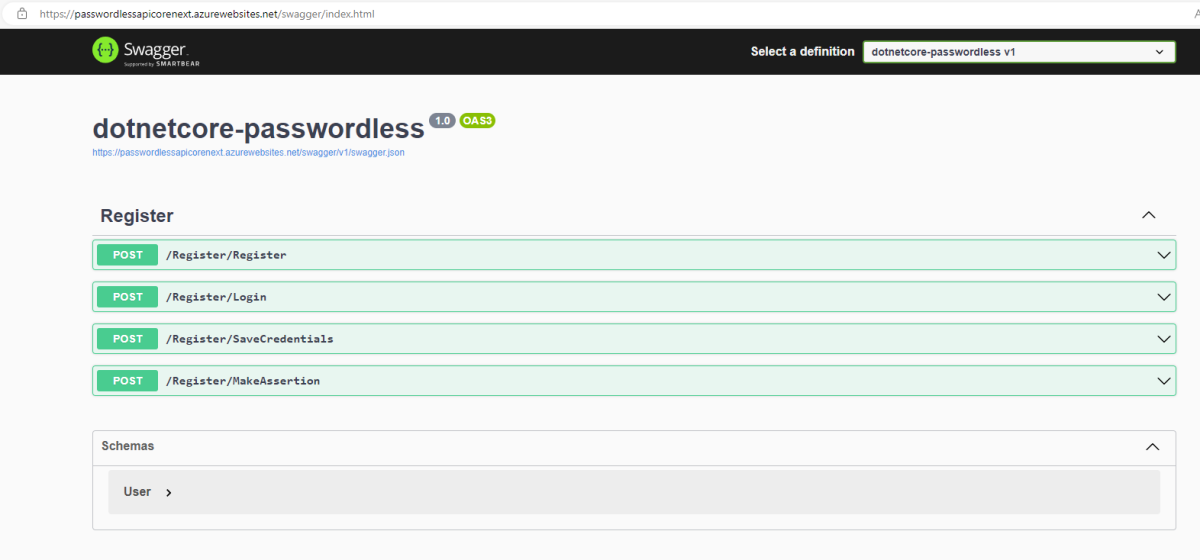
Then, navigate to your Azure Portal, and to your subscription ofcourse, then click on your WebApp and copy the Default Domain value. In my case it is: passwordlessapicorenext.azurewebsites.net
Click enter and you should be able to see the swagger page with available API endpoints:
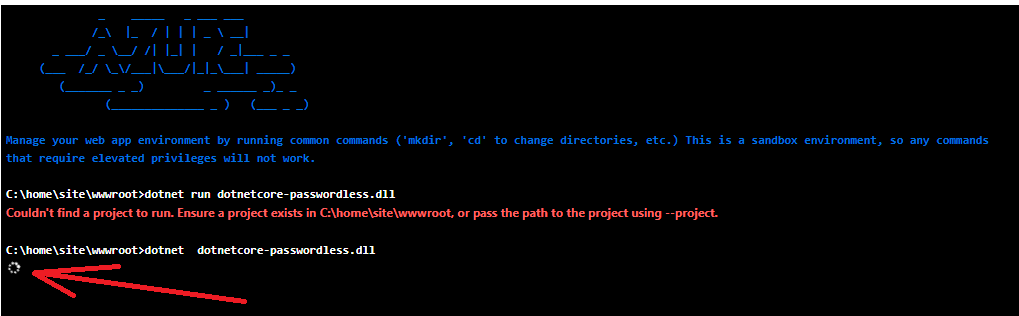
If you get 500.30 In-Process Startup Failure error open console inside your WebApp as below:
When the console opens, type:
dotnet dotnetcore-passwordless.dll
The name of the dll you can find it in publish directory locally when we published the API locally:
If everything is ok, you should see turning circle that never stops. Most of the startup errors should appear here in console, very detailed:
Another way to deploy this API would be by packaging everything to Acure Container Registry and adding our image to Azure Container Instance with the help of Docker.
As the heading suggests, I want to discuss a little bit on how to manipulate raw DataTable data that you get from some source. Mostly, and in many cases it is database, an SQL database maybe, where you fill your DataTable with rows from one or more SQL tables.
In the end , when you fill your DataSet object or, for the sake of this example, DataTable object, you can use that data in your business or front end Razor logic. You can use it wherever you want.
Let’s jump directly to code:
This file contains bidirectional Unicode text that may be interpreted or compiled differently than what appears below. To review, open the file in an editor that reveals hidden Unicode characters.
Learn more about bidirectional Unicode characters
On line 1, above, we get distinct list of rows based on COLUMNONE grouping. This will tell us how many groups and sections we have.As you can see, we already know the data type of our column. This is written and should be known manually by physically going to the database or reading back end logic associated with your datatable data.
On line five, we again run a query on our DataTable but filter it with LINQ Key keyword. The key is the property of the object on which we have done grouping before.
Then, on line 10, we iterate our list and get the column details values from it.
This code, as you can see in the comments, can be added on server side, and on client side in Razor View between the @{} .
The i, is there to hold the count of total items in each group.
There is nothing special about this hyperlink. It is very basic, does what it is supposed to do, which is navigating to the address that you provided in href.
Next one, I call it semi-static, which navigates to exactly the page you want, like so:
Next one, I call it dynamic link, because it has the ability to navigate to the same page but with different options on that page. It depends on the programmer what kind of options he or she want to show:
The reason that I called it super dynamic is because it uses RESTful architecture and HTTP programming with GET, POST and PUT methods.But that is beyond the scope of this blog post.
Now, lets say, you have already WEB API written in C# and ASP.NET MVC. It has unique controller, and GET, POST and PUT methods in place. Meanwhile, an old website, written in classic ASP, with .asp file extension pages, needs to access our API to get full blown HTML page, and replace old page with newly designed cshtml view, by two ways:
Either by clicking a link on an old ASP page and opening new cshtml view in new tab or window
Or embedding our external cshtml view that our WEB API returns in an IFRAME or object in old classic ASP page.
Now, for either of the two cases, we need HREF. A link. A hyperlink. Besides, classic ASP page has different product numeric IDs, in a drop down list, that need to be passed to WEB API to get static cshtml view, based on user selection.
So what do you think ? Which kind of hyperlink we will need ?
Obviously not static, and not semi static. We can use dynamic, but since we have WEB API C# in place, we need super dynamic hyperlink.
Now as you know, that passing pure product IDs in a query parameters is not a good idea, because someone very curious might want to try different ID instead of the one that is in our hyperlink, resulting him or her getting product that does not belong to him or her.
So, if your parameters are numerical, like 34523, or 88890889, and not strings, you could do something like this, from inside your classic ASP page:
This file contains bidirectional Unicode text that may be interpreted or compiled differently than what appears below. To review, open the file in an editor that reveals hidden Unicode characters. Learn more about bidirectional Unicode characters
And in C# WEB API Controller, you will have a GET methos, that looks something like this:
This file contains bidirectional Unicode text that may be interpreted or compiled differently than what appears below. To review, open the file in an editor that reveals hidden Unicode characters. Learn more about bidirectional Unicode characters
If you notices, 678957 is being used on classic ASP page to multiply the product ID. It is like secret or salt in md5, something similar. And, same number above is used in WEB API c# code to divide the same number to get the original ID.
So building a hyperlink is not so easy it turns out to be. However simple it looks.
Also, first code block has a tag like this: target=“myIframeInClassicASPPage“. It means it targets another tag with ID myIframeInClassicASPPage, which we decided to be iFrame. So we want the external cshtml view to load in iFrame, from ASP.NET MVC WEB API C# project in IIS.
Now, in case , and just in case, because I have stumbled across such a thing, your cshtml view does not load in classic ASP, or iFrame displays weird, check your IIS HTTP headers, and explicitly set X-UA-Compatible property in HTTP Headers section ( You will have to define new HTTP header for your website ) to IE=edge.
This is for it to be cross browser and render properly in IE. I am writing this because I am assuming you are using scripts, bootstrap, font awesome, and all other libraries that need to load with cshtml page as well. So this helps, and works brilliantly !
The end result, is that we have built a super dunamic hyperlink that renders ASP.NET MVC views in classic ASP site page’s iFrame, with all of views scripts, references, etc, using WEB API.
We will party later on. But for now, we need to get a small word out. It is nothing special until you are confronted with it, and, in production business environment, and not at your couch! So I only have a user name and password, which is splendid ! I have user name and password for remote machine, literally. Remote machine is Windows Server 2008 R2. Now, with all the threats flying around remote accesses, password managers, which I wrote one for my self indulgence here https://thoughtsonprogramming.wordpress.com/2018/08/26/password-manager/
, and facebook “Impersonation” hacking, which just happened days ago, I had a challenge to upload a file to remote server,very far away, having user name and password.
Relying on experience, and not listening no anyone around, I took the SHARE path. Meaning I will have to access a shared folder on that remote computer, and a share that I will have to ask sys admin to enable or create a share of parent folder myself.
I remind you, it is not childish game at my home. It is production environment. Things fly by fast.
First, where my ASP.NET MVC app resides, on IIS, we need to set its application pool identity access to the user name and password of remote machine. That way, it will allow our ASP.NET app to access remote server. IIS itself will let you play around and access network classes and namespaces.
So, after we have done that. We need a Windows Share access. It looks the same like oAuth API access, where you first obtain a token, then use that token to do authorized things you want to do. But here , you get access to the share, and IIS handles the rest, meaning it lets you copy and transfer files.
Besides, by using “Share” way to transfer files, it is convenient for sys admin on the other side to see all current and live sessions that are open concerning this particular share. So security wise, very convenient.
And we, on the other hand, open share connection, and then close it once done.
Now, I am using C#, my best language so far.
So, from C#, in ASP.NET MVC, we need to first obtain an access right to remote folder, then copy my file.
I found the network class for my dear C# language, on the internet. I use it to access remote share. Here it is:
This file contains bidirectional Unicode text that may be interpreted or compiled differently than what appears below. To review, open the file in an editor that reveals hidden Unicode characters. Learn more about bidirectional Unicode characters
As you can see from the code above, we use DLLImport to obtain access to native windows DLL, which is Mpr.dll.
We could have taken the WMI option, with all of its convenient operations, which allows you to control the remote machine. But we do not want to control. We want to copy and delete a file when we need to.
So the code above only opens and closes connection to our remote machine. It does not copy files. Later we will only use standard System.IO.File.Copy(source, destination) method from C# to do the copying, once the Share connection is open.
The idea is similar to oAuth when obtaining a token, then doing something with that token, only oAuth is stateless, meaning no session is kept alive, while our method here is real time and synchroneous, where connection is open until closed.
So, after we add this to our project. and in our ASP.NET MVC, we need to call that method like so. Of-course depending on your particular needs, and the needs of an app you are using. But for me, it worked charmly as so:
This file contains bidirectional Unicode text that may be interpreted or compiled differently than what appears below. To review, open the file in an editor that reveals hidden Unicode characters. Learn more about bidirectional Unicode characters
The bottom line here is that I am not using IMPERSONATION !
First, we authenticate ourselves, the thing that I like the most, almost like in oAuth protocol, only better ! :)))))))))))
Then, once o”Authenticated”, on our “Share”, we do whatever we want.
With so much money spent on security these days, looking forward to hear some responses on whether it is safe, or not, real or not, practical or not, true or not true, well, to access remote shares in that way.
Have any other clue on doing it stuntly in a different way, please comment.
Source code is at the end of this article, on Github.
One of the reasons that I like SignalR is its ability to identify users by simply them, opening your web page. I would also highly recommend using it for Push Notifications.
Unlike web services, it allows two different objects, residing on two different machines, and in two different applications, to talk to each other.
There are many complex applications for SignalR like scaling it on your own local server, or self host the HUB, or using it as a background worker behind the scenes.
Sometimes, SignalR looks to me as an API that does the mapping between your client and server side functions.But that is just me, no?
On the other hand, if NuGet has close to five million downloads of SignalR, as shown in the picture below, and this is on June 28,2018, then one must consider this technology when the need arises to work with Real Time Data.There is no need to reinvent the wheel, in my opinion.
But let’s start from simple things, once we are able to do that we will be able to jump to the next step.
What we are going to do is exactly the following:
-Create a web page for everybody to be able to visit it. Also, the user will have the option to log in with google, in order to identify him or her. This option is optional in SignalR, no obligation to identify oneself at all, because SignalR knows you without the need to know your name.
What I mean, in simple words, is that Admin, in our example, can send anonymous user a message, as well as authenticated user, with his or her name. For SignalR it does not matter, but for human logic, it matters. Let’s consider a case where small number of people are on the network, logged in to the site, and Admin wants to reach and send a message to particular person, then of-course, he needs to know other person’s name, that’s all !
To do this, and to give the user an option to identify himself or herself, we are going to use google sign in button:
When user clicks on this button, he is authenticated with google, and we get the following information from him, as described by Google itself:
This file contains bidirectional Unicode text that may be interpreted or compiled differently than what appears below. To review, open the file in an editor that reveals hidden Unicode characters. Learn more about bidirectional Unicode characters
As you can see form the code, and we will use it, that after a user signs in with google, provided of-course that he has a google account, in return the admin, or the web page gets such info as Full Name, Given Name, Family Name, and Email. All this info is provided from Google. We can use this info, for convenience of both parties, and trustworthiness of both parties, the website, and the users as well, to store their information in our SQL database table below, and do the MAPPING.
Please replace this client id, with your own, when doing google sign in.
Mapping will be done between user’s name, above, and SignalR ConnectionID ! Because when SignalR will want to send message to particular ConnectionID, we can refer in our message the user’s actual name that he or she has provided.
SignalR gives you freedom in this situation. It is nice.
Important note to remember, when testing on Firefox, everything works fine except that Firefox takes longer to close connection once the user closes browser or refreshes the page, so the OnDisconnected SignalR method will take a little bit to be invoked. On Chrome it is fast.
Let’s start by creating SQL table that will hold our connectionIDs for each new connection to our HUB, and user’s information, if he or she wants to identify himself or herself, no obligation whatsoever.First create database MySignalRUsers, then create the following table below:
This file contains bidirectional Unicode text that may be interpreted or compiled differently than what appears below. To review, open the file in an editor that reveals hidden Unicode characters. Learn more about bidirectional Unicode characters
Now for the application logic, let’s start from the server or SignalR server, that will accept all connections, client’s and Admin’s on http port 8080, pick any unused port, it does not matter. We will make a console app, as described in SignalR examples on their site, but tweak it a bit. We will add two new methods:
public override Task OnConnected()
and
public override Task OnDisconnected
In OnConnected we will get the connectionID of new user, and insert it in our database, and later update it with Mapping information for each user if he or she decides to log in and authenticate. And in OnDisconnected we will remove the whole row for a user that closed browser and ended the session, or disconnected.
The code below is Program.cs file, with it’s starting Main method, for console apps:
This file contains bidirectional Unicode text that may be interpreted or compiled differently than what appears below. To review, open the file in an editor that reveals hidden Unicode characters. Learn more about bidirectional Unicode characters
Now for the code above, we can build it in release mode, take the executable and put it on remote machine and server. It does not need to be localhost:8080.But if we do that, we will need to change the endpoint to match remote server’s endpoint.
Now for the client part, we will create a standard asp.net web application, with two pages: Default.aspx which will be for all users of our website, and Admin.aspx which will be only for administrator who will ping or send messages selectively to all current online users.
The code for Default.aspx and Default.aspx.cs is below:
This file contains bidirectional Unicode text that may be interpreted or compiled differently than what appears below. To review, open the file in an editor that reveals hidden Unicode characters. Learn more about bidirectional Unicode characters
And the server side code for Default.aspx, which is Default.aspx.cs
This file contains bidirectional Unicode text that may be interpreted or compiled differently than what appears below. To review, open the file in an editor that reveals hidden Unicode characters. Learn more about bidirectional Unicode characters
In the code above, we marked BindDataTable as WebMethod because we will call it from front end page with Ajax call and POST, in order to add user Mapping for each connection ID and bind logically which connection ID is for which User:
Now the Admin page or Admin.aspx, which will be only for Administrators:
This file contains bidirectional Unicode text that may be interpreted or compiled differently than what appears below. To review, open the file in an editor that reveals hidden Unicode characters. Learn more about bidirectional Unicode characters
And of-course the code behind file for Admin.aspx:
This file contains bidirectional Unicode text that may be interpreted or compiled differently than what appears below. To review, open the file in an editor that reveals hidden Unicode characters. Learn more about bidirectional Unicode characters
In the code above, we only load all currently connected users and bind them to our multi drop down list.
To test this, start SignalR server, then launch your website, the default page will look as below:
The server, will look as picture below, with already several connections happened or happening:
Now open the Admin page or click on the link “Admin Page” in a new tab or new browser window:
The first multi drop down holds connection IDs and their names in case one Signed In with “Sign In With Google” button. If you refresh the page it will update all the connection IDs with their details respectively. For example if you take a careful look at the picture above, the second ID has no name. This is because this ID is for the Admin page actually, since Admin page also initiated SignalR connection.
You can play with it depending on your needs of-course.
Now, while on this page, select any ID, except the Admin’s ID, write some text in text box, and hit Send. Now switch to client Default.aspx window, and you should see the picture below. with Notification popping up on client side with the text that we sent:
In Summary, we have implemented a solution where Administrator of a website can ping or send messaged to currently live logged in or not logged in users. The logging in is performed with Google Sign In Button, which , to implement, you first need to have google account and add new project in Developer’s Console, then get client ID and secret to use, as shown in the cod above.
The code for the server part of this project is on GitHub:
Sometimes a client asks to update his current web solution, with credit card payment page to mobile and web solution.
The functionality should stay intact, but user interface must change to accommodate mobile devices view ports.
And not only that. On the old classic ASP website, a client has credit card payment page, linked directly to their API, which uses iFrame with their src property.
I especially prepared an example explanation sketch to illustrate the old asp page, to some extent, architecture:
As you can see here the page looks a little bit similar to the old style “Secure Cross Domain Communication in the Browser” with IFrame URL technique except that when the user presses the submit button on pop up iFrame box, we call the Submit Page function that will trigger AJAX POST request, and onSuccess: we will set the content of the whole ‘htmlContentDiv’ with the TOKEN, plus client details.
The pop up iFrame was just to generate token. It do not get confused here, we are not using OAuth, neither we are using the iFrame URL technique. What we are doing here is we are simply generating secret token ( from client API) and returning it to us via Ajax and JavaScript, but before that generating secure link with correct post parameters. That’s all.
Now, when moving this little bit old functionality to new ASP.NET pages, we can do the following:
As you can see, on page load we also generate our secure secret link with correct parameters, and we directly assign it to the src attribute of our visible iFrame, without the need of clicking on a separate button to generate the popular iFrame. The src of the iFrame is generated directly when we load the page.
Then, when we hit the actual submit button, we will call JavaScript Function SubmitMyForm, which will take only the credit card number, send it via JavaScript Ajax post method, receive a response with generated token, then create new form programmatically from JavaScript, and finally submit our “on the fly” generated form, with token .
As you can see all this functionality was needed just to generate token, because the client does not want to submit a form with raw credit card numbers, compliance works that way.
We first generate token via AJAX and then submit a form via AJAX also, with token and not bare credit card number.
The good thing about technology, is that it allows us transcend, upon our will and choice,the need to cut more and more trees to produce everyday paper.
Going Eco-Friendly is always a good and healthy choice, and instead of sending regular mail, with paper inside it, you send E-Mail. And instead of printing your email out on a sheet of paper, you can read it on your preferable tablet device or phone.
So what if you want to read all your emails from gmail, for example, not using browser at all. But instead a special kind of program that you can embed in a device of your choice and read all your emails electronically, like Alexa, telling Alexa Amazon “Alexa, read all my gmail emails !”
Sometimes, you have a need to read all, part, or latest received emails from your email provider, and store only needed parts and data within them in database, as well.
There could be two case scenarios. One is that you will be reading structured data and another that you will be reading unstructured email data. Most of the cases it is the last case ( unstructured ).
The question arises, why would one want to read this data ? The answer is to store part of it in our database for clients to use.
Suppose a robot sends automated emails with configuration and updated information about all printers on different networks, like their start time, shut down time, ink levels, number of papers printed, and a lot more information.
Our program should grab new emails , read them, take necessary data in them, and store that data in our database for other people to be able to see using front end web based interface.
Let’s say that printer was programmed to send the following information, without spaces or new lines in the beginning:
PRINTER ID:2233QWERTY
PRINTER NAME: SPACER
PRINTERTYPE:SUPERTYPE
TIMEOFDAY:SUNSHINE
PAPERSPRINTED:1000000
DOUBLESIDED:NO
USERS:ALL
, with the following subject line:
MY PRINTER STATS
I will use open source library, to read email, and I am going to use Gmail as test server. Particularly Gmail POP3 server.
We are also going to authenticate ourselves in a slightly different way. Gmail allows authentication via oAuth, but since I blogged a lot about oAuth, I will use another way.
We will append “recent” word before our user name, as such: “recent:sendtestsms@gmail.com”. The word recent in gmail before user name allows us to get ALL emails for the past 30 days, downloaded or not, because in Gmail, once you download your messages once, you cannot download them again.
And again, we could have created an app, added Gmail API and used oAuth, but this way is different. It will also teach me and you how to use open source free for all library for POP and IMAP called OpenPop.NET.
First, let’s create database with single table in our SQL database:
This file contains bidirectional Unicode text that may be interpreted or compiled differently than what appears below. To review, open the file in an editor that reveals hidden Unicode characters. Learn more about bidirectional Unicode characters
Now let’s create our table called PRINTERSUNSHINE.
This file contains bidirectional Unicode text that may be interpreted or compiled differently than what appears below. To review, open the file in an editor that reveals hidden Unicode characters. Learn more about bidirectional Unicode characters
Now head to Visual Studio. I am using VS 2015. You can use any version you like. I like community versions. Create new console APP or solution, and issue this command in Tools > NoGet Package Manager > Package Manager Console:
Install-Package OpenPop.NET -Version 2.0.6.1120
Right click on project and create new folder called: EF. We are going to add our ADO.NET Data Entity Model there.Call it PRINTERSTATSFROMEMAIL, and follow step by step screens to add entity model from our newly created table to the console app.
After that, and in Program.cs, at the top add two using statements:
using OpenPop.Mime; using OpenPop.Pop3;
This lets us use the OpenPop classes with POP3 functionality.
And below is the actual code for Program.cs with Main method that is an entry point for console apps:
This file contains bidirectional Unicode text that may be interpreted or compiled differently than what appears below. To review, open the file in an editor that reveals hidden Unicode characters. Learn more about bidirectional Unicode characters
We can use our imagination, or depending on requirements for example, and add this code to Windows Service, that will repeat itself each couple of seconds. Or we can create Java Script function with timer and SetTimeOut function, and with the help of XMLHttpRequest AJAX object, call our function that is in Home Controller, or at some REST endpoint. In short we can create our own API and then call it from anywhere.
Please do not forget to change email and password with your actual email and password.
Moreover, and as I mentioned before, data inside email can be structured, unstructured, HTML based email or TEXT based email, with different encoding. It happened to me once with structured data, so to say. Printer was sending structured TEXT based emails, hundreds per day, with fixed line positions, meaning heading for printer name would be on line one always. Then one day, I asked my system administrator to resend me new email from new printer that he added,in order for me to add code to match its name. Me, without thinking, replied to his email, saying “Thanks”, that’s it.
The next day, we stopped receiving any data in database, if you query for today’s data, there is nothing in database, meaning the program did not insert anything.
I opened the original program that was doing email GET,which I wrote myself, everything seemed fine, with new additions as well, but somehow, it was throwing an exception index out of range. I also opened a temp text file which I use to store each new email in a text format, after I read it,and there is was ! The email that threw an exception was there, because the file was not overwritten with new email. What is interesting is that it was not regular email with printer statistics, but it started with <!DOCTYPE html PUBLIC meaning that it is HTML document. While all emails from printer come only plain TEXT based, for better readability and better and clearer handling of its content. Also, all lines that I hard-coded , because I mentioned that I was dealing with structured data, did the following mapping,if you wish:
Line one contains Printer Name and Printer Model
Line five contains three different printer variables that I need
And so on…
Their order never changes.
Now, this email, first of all was HTML email, meaning that HTML tags were in text based form, like <br> <hr> <p>. They were all there. And, it was not word wrapped,nor per line at all. In short, Unstructured. And this is because it came from my email, which sends emails in HTML format.
I then added a global variable, to hold which line we are in while traversing the file, and replaced each line index word with that global constant. Also, I deleted the reply,because it contained already duplicate data, and in both cases, I will not need it.
The program worked as charm. With structured data, grabbing all emails’ content, and inserting it in the database, then deleting the actual email.
Adding charts to your project, usually takes a little bit thinking. Because there are many open source plugins available, but choosing the right one that fits your needs, and the needs of your client could be tricky sometimes.
I choose Chart.js. It is lightweight JavaScript open source plugin available on GitHub because it has all basic functionality that I need, with a lot of easy customization options, including, for example, percentage display of your data, multiple data sets is a single chart, labeling plugin if you want, coloring choices, and nice hover style options.
It is also very simple to set its size to fit desktop, tablet, and mobile devices.
And as you might have guessed, mobile internet browsers are increasing day by day, with smart phones becoming the preferred choice for everyday busy users, and Chart.js does an amazing job of displaying our charts on mobile devices, in order for users to see clearly our data, and very fast.
In this project, I am going to use also Bootstrap.css, for presentation purposes, and for mobile and tablet visibility. So we are going to include only two references to two libraries: Bootstrap.css and Chart.js.
First, we will create a new ASP.NET MVC project, and in Models folder we will add new class called ChartModel.cs. The class is below:
This file contains bidirectional Unicode text that may be interpreted or compiled differently than what appears below. To review, open the file in an editor that reveals hidden Unicode characters. Learn more about bidirectional Unicode characters
As you can see from above, our first chart has only one data set, with three data points. Our second chart, has two data sets with five data points each.
Now open _Layout.cshtml, which is our layout page for Index view, and add the code below:
This file contains bidirectional Unicode text that may be interpreted or compiled differently than what appears below. To review, open the file in an editor that reveals hidden Unicode characters. Learn more about bidirectional Unicode characters
As you can see from above code, we have a reference to bootstrap.css and Chart.js inside our project. Then we add jumbotron for presentation purposes, and add a title and description.
Next, and the our core functionality is our Index.cshtml view:
This file contains bidirectional Unicode text that may be interpreted or compiled differently than what appears below. To review, open the file in an editor that reveals hidden Unicode characters. Learn more about bidirectional Unicode characters
Those are model values that we set in the home controller.And this is our home controller:
This file contains bidirectional Unicode text that may be interpreted or compiled differently than what appears below. To review, open the file in an editor that reveals hidden Unicode characters. Learn more about bidirectional Unicode characters
As you can see from the code above, we set our points in the Index Action result, and return our Model to our view, that we created earlier:
returnView(“Index“,myChartModel);
Also, in order to draw our data points on the chart itself, each percentage in its according place on the Pie chart, we need to use plugin, as shown above. To draw only on first chart, our first chart has only one data set, so we check for this condition inside our plugin as such:
First we initiate a variable to hold number of data sets, because this plugin loops for each chart on the page, thus letting us know how much data sets each chart has:
Since we know that our Pie chart has only one data set, we can check for its condition here:
if (numberOfDatasets==1) {
And, accordingly, if the condition is true, continue to draw the percentages. The percentages, we need to generate by ourselves too, they are not included. To do this, we compute each percentage and put it in our datastring variable as such:
We can create Cases in Salesforce in two different ways. One is using REST API, and call the POST method at the endpoint that Salesforce has provided, pass required parameters, and create a Case.
The other one is using WSDL, and SOAP, as web services, and use their exposed methods and API.But to use the WSDL API,we need to download physically to our machine WSDL FILE from Salesforce, store it on a disk, and add reference to it locally to our Visual Studio Solution.There is no online link to the web service where you can simply point your discovery tool and see all the methods exposed.
1
When using REST call, it depends which Salesforce Account you have opened. For authentication, and if you are on Sandbox Account of your company, you need to use:
As well, and it is a necessity,if you are using REST API to authenticate yourself and then create a case, then you need to create a Connected App.
If you are on a sandbox account under your company, next to your logged in name, click on setup. Under Quick Links below, then under App, click on Manage Apps. Scroll to the bottom and you will see the heading Connected Apps, to the right of it there is New button. Click on it to create new connected app for oAuth REST authentication purposes.
You will be presented with a form, with red horizontal bars, meaning they are required.Filling only the required ones is enough.
-Connected App Name: Any Name you want for your app.
-API Name: You can put it same as Connected App Name.
-Contact Email: Same as your log in email.
Next Section would be API (Enable OAuth Settings)
Check the checkbox labelled “Enable OAuth Setttings”
For Callback URL, put any dummy web address starting with https. Ex: https://mydummysite.com
In Selected OAuth Scopes multiselect, choose Access and manage your data(api),and add it to Selected OAuth Scopes empty multi select by pressing Add button.
Leave it checked or check the checkbox labeled “Require Secret for Web Server Flow”
Hit save button below.
You will see a message:”Allow from 2-10 minutes for your changes to take effect on the server before using the connected app.” Press continue button, and you will be presented of the Settings page for our newly created app. Note down those two fields under API (Enable OAuth Settings), Consumer Key and Consumer Secret.
Next we need to first reset our security token, and note it down. First head to Your Name at top right, then My Settings, then Personal item to the left, then click on Reset My Security Token, and click on the button with name “Reset Security Token”.
The new security token will be sent to your email. Write it down too.
At this point, we have everything we need to write REST call using c# to create a new case.
The response after successful oAuth authentication and authorization at Salesforce should look something like that:
Our REST app will have to be divided into two parts. First part will call one Salesforce endpoint to authenticate and authorize ourselves. The next part, will call another REST endpoint POST method to create new case.
After you create a new Case in Salesforce using REST, the response should look something like that:
If you noticed, there is a word “Created”
Please note, when using REST HTTP calls to create a new case in Salesforce, we are not using any downloadable separate libraries from Salesforce, or any SDKs, or from anywhere else.It is only HTTP, C#, https endpoints on Salesforce servers, and that’s it. This is very important to remember because the next way, as this posts Title says, will deal with WSDL and SOAP.
Also you will have to install DeveloperForce.Force and Newtonsoft.Json packages from NuGet, in order to create a new Case:
After you create a case, and log in to your developer, for example, Salesforce account, you should see the following cases below as such:
2
The second way to create a case in Salesforce is by using traditional web services. The only difference is that Salesforce rules say that you need to download particular WSDL, depending what API you want to work with, and integrate it in your development environment, which is Visual Studio and C#. In our case we need the enterprise WSDL.
In our sandbox environment, under our company, let’s click on setup beside our login name, and in Quick Find/Search, type api. Below, under Build section, there is Develop section, and beneath it is API link. Click on it, and a page win title API WSDL is opened to the right with the following WSDLs:
-Enterprise WSDL
-Partner WSDL
-Apex WSDL
-Metadata WSDL
-Tooling WSDL
-Delegated Authentication WSDL
-Client Certificate
-Enterprise Package Version Settings
-Partner Package Version Settings
Select Enterprise WSDL and beneath it click on Generate Enterprise WSDL.
You will see in the next screen that you can choose the API versions that you want .We will keep the default, which is the latest ones. Click generate.
This will download or open an XML file. Save it in accessible directory, we will add it as service reference to our WSDLCreateSfCase project.
After you add this reference, you will be able to generate new cases on developer Salesforce account as well.
After successful login you should see something like this:
And, after creating a case, using WSDL, you should see something like this:
I enjoy creating databases, it trains my analytical part of my mind. Besides, when creating it working with someone else, there is a lot of room for improvement, from hearing someone else’s opinion, because business rules are set there, at least the most of them.
I also used to work in a distribution warehouse center, where big trucks would come in, products in a boxes unloaded with help of workers and put on wooden square plates,those plates put on Jigger Lifts or a Forklift and moved to their correct location temporary storage in the warehouse.
Jigger Lift
Forklift
Then, workers would make new carton boxes for new orders, that will be delivered to different shops and outlets, label them based on clients name,and put in a line.
Carton Boxes
In other place in the same warehouse, a special space is dedicated for ORDERS. Orders are printed on paper by warehouse manager, with different product names and quantity per order and per client perhaps, on a single sheet.And workers would go and get all the boxes needed for a single order from different sections of the warehouse, and bring them there.
Then those boxes, per order, would be distributed to the boxes that are in a long line.
Once the box in that line is full, it is closed, sealed with regular scotch paper, and again put on a wooden plate for order sending. Now I am intentionally not using word shipment here not to confuse you, developer and programmer, with something else. I will tell you later why.
As you might have guessed, inventory management systems are so many here and there, and almost every store who has a warehouse has some kind of tracking mechanism for his merchandise.
This particular example is not IMS ( inventory management system ). It is more like general distribution warehouse outlet software program, that warehouse managers, and their co-managers use to track, label, and instantly count products that come in from supplier, and at the same day maybe, leave the warehouse.
I am going to use SHIPPING, only related to SUPPLIER’s coming products to our warehouse, because some may confuse shipment with shipments to the client. In fact some use shipping referencing shipping to clients their orders, but we are not going to do this because later it gets very confusing what is SHIPPING and what is SHIPMENT, the definition of those words I mean.
We will use Database First approach, because this design is available to our disposal, it is convenient for our situation, it is necessary actually for our warehouse distribution outlet because in this environment, there are many nuances that are better off handled from the beginning in the database logic.
We will do the heavy thinking in the database layer, design our logical and real database, clarify all definitions, set our own definitions and standards, and then do the simple and light front end design.
So we are going to separate our app into three layers, back end, which is database design and implementation, front end, which is a web page, bootstrap built from beginning to accommodate of-course mobiles of all sorts, as well as browsers of all sorts, and then we are going to jump a little bit into our middle layer implementation which handles such logic as copying a product, adding new product and so on.
In short this is what is going to happen:
SUPPLIER is going to send us a SHIPMENTof the products that we need
Our distribution warehouse app is going to store all our products, label them, name them, order them and copy them,because copying helps us later on creating new or similar products by simply selecting from existing copied one and configuring it a bit.
Our clients are going to make ORDERS . We will make our order and send it to client, making revenue and selling products.
To start designing our database, I think it is a good idea to keep up with the chain. At least this helps me not to forget where our database objects are.
If we keep up with the chain, then we can save a lot of time designing this, finish quickly, and hand it to the client ASAP.
Ok. Chain !
Let’s go !
We will begin with SUPPLIER. I will not bore you with details, as you might have guessed, all tables have IDs, Primary Keys, and essential columns that describe and relate ONLY to SUPPLIER object and definition.
So, we will need those columns:
This file contains bidirectional Unicode text that may be interpreted or compiled differently than what appears below. To review, open the file in an editor that reveals hidden Unicode characters. Learn more about bidirectional Unicode characters
As you can see, we put only nouns that describe SUPPLIER, his country, fax number, tel number, his address. Country ID is foreign key to Country table, which in our chain we will create next.
So, the Country table and object which we will use to refer our supplier to , or in other words, one country can have many suppliers, or there could be many suppliers from one single country. Therefore, we need to put one to many relationship from COUNTRY table to SUPPLIER table. Therefore, our SUPPLIER table will have foreign key countryID relating to countryID Primary Key in COUNTRY table. Here is COUNTRY table:
This file contains bidirectional Unicode text that may be interpreted or compiled differently than what appears below. To review, open the file in an editor that reveals hidden Unicode characters. Learn more about bidirectional Unicode characters
So below are our two tables that we have just created: SUPPLIER and COUNTRY. We need this to see how to create relationship one to many from COUNTRY to SUPPLIER:
To create one to many relationships in SSMS from COUNTRY to SUPPLIER , always start with Foreign Key table, which is SUPPLIER in our case. Right click on it, go to Design, in the white space to the right, right click, and you will see those options below, click on relationships, as shown below:
Once you click on relationships, we see the following window in SSMS:
Please click on Add to the left, a new relationship is added, then to the left click on ellipsis next to Tables And Columns Specific to see this window, to configure foreign key column(many) and primary key column (one) in one to many relationship.
Click OK. So, as you can see, we have configured one to many relationship from COUNTRY table to SUPPLIER table. And so on . I am not going to repeat this again because we will do the same for other tables in our Chain of tables.
It is also very important to normalize our database to first normal form, or at least close to first normal form, meaning that we need to eliminate repeating values in rows completely. It is not impossible if you try hard enough.
Then, we create another table called SHIPMENT.It will hold products that our SUPPLIER sends us. Remember, as mentioned earlier, SHIPMENT in our case is NOT orders to our clients, but it is the shipment that our supplier sends us with products that we asked. We will refer to shipment to our clients as ORDER, inside our middle tier layer later on.
Shipment Table:
This file contains bidirectional Unicode text that may be interpreted or compiled differently than what appears below. To review, open the file in an editor that reveals hidden Unicode characters. Learn more about bidirectional Unicode characters
Now, to achieve first normal form between SHIPMENT and SUPPLIER, we need to create new table, intermediate, between SHIPMENT and SUPPLIER called SHIPMENT_SUPPLIER. And, of-course, as you may have guessed, we will add relations to join those two tables, on our third table. So, we will add one to many relationship from SUPPLIER to SHIPMENT_SUPPLIER and from SHIPMENT to SHIPMENT_SUPPLIER, where :
SUPPLIER PK -> SHIPMENT_SUPPLIER FK
SHIPMENT PK -> SHIPMENT_SUPPLIER FK
Now we are done joining shipment to supplier.
Next, we need details about our shipment, like shipment date , shipment arrival date and so on. So we will add new table that describes our shipment in more detail. We will call this table SHIPMENT_DETAIL:
This file contains bidirectional Unicode text that may be interpreted or compiled differently than what appears below. To review, open the file in an editor that reveals hidden Unicode characters. Learn more about bidirectional Unicode characters
And we need to add one to many relationships from SHIPMENT table to SHIPMENT_DETAIL table
SHIPMENT PK -> SHIPMENT_DETAIL FK
Now this is our first part of our database, or first general section if you wish, that deals with suppliers shipments and its details, and keeping track of them.
The second part of our database design, will have to do of-course with PRODUCT, that is stored in our distribution warehouse on shelves, rotated around here and there, assembled and packed in cardboard boxes, and then sent to clients and their ORDERS.
Let’s create PRODUCT table, simple table with three columns. The details of PRODUCT we will separate to another table called PRODUCT_DESCRIPTION and the details of each product like size, price and weight yet go into third table called PRODUCT_DESCRIPTION_DETAIL.As you can see this is also a small CHAIN of three tables.
So, to summarize our second part of our database design, we need three tables that describe PRODUCT:
PRODUCT
PRODUCT_DESCRIPTION
PRODUCT_DESCRIPTION_DETAIL
PRODUCT:
This file contains bidirectional Unicode text that may be interpreted or compiled differently than what appears below. To review, open the file in an editor that reveals hidden Unicode characters. Learn more about bidirectional Unicode characters
This file contains bidirectional Unicode text that may be interpreted or compiled differently than what appears below. To review, open the file in an editor that reveals hidden Unicode characters. Learn more about bidirectional Unicode characters
Now add one to many relationship from PRODUCT to PRODUCT_DESCRIPTION on corresponding productID fields in both tables. They do not need to be named the same, as long as they have exactly the same data type.
PRODUCT PK on productID (one) -> PRODUCT_DESCRIPTION FK on productID (many)
Now add third table:
PRODUCT_DESCRIPTION_DETAIL:
This file contains bidirectional Unicode text that may be interpreted or compiled differently than what appears below. To review, open the file in an editor that reveals hidden Unicode characters. Learn more about bidirectional Unicode characters
And add one to many relationship in our CHAIN from PRODUCT_DESCRIPTION to PRODUCT_DESCRIPTION_DETAIL:
PRODUCT_DESCRIPTION on productDescriptionID PK (one) –> PRODUCT_DESCRIPTION_DETAIL on productDescriptionID FK (many)
So the second part is done. But we are missing something. Those two parts, the SUPPLIER and SHIPMENT part , and PRODUCT part are not linked. They are separate clouds in the sky, floating, not related in any way.
So we will relate them by creating new table called SHIPMENT_PRODUCT_DETAIL, which will join the two sections through, and using two tables from each section corresponding:
SHIPMENT_DETAIL (SECTION ONE)
PRODUCT (SECTION TWO)
So here is the table SHIPMENT_PRODUCT_DETAIL:
This file contains bidirectional Unicode text that may be interpreted or compiled differently than what appears below. To review, open the file in an editor that reveals hidden Unicode characters. Learn more about bidirectional Unicode characters
And now we create two relationshipsto those two tables:
SHIPMENT_DETAIL on PK shipmentDetailsID(one) –> SHIPMENT_PRODUCT_DETAIL on FK shipmentDetailsID (many)
PRODUCT on PK productID (one) –> SHIPMENT_PRODUCT_DETAIL on FK productID (many)
After finishing our third part, we review everything, all database logic, and we see that something is missing.
What is missing is BOXING DETAILS, and how much of each product boxes has arrived, and how much tiny boxes inside big boxes has arrived, and how many pieces are there in each of these sub -boxes.
Now, to add all those details to PRODUCT table would not be fair, because logically, it is shipment related matter, but at the same time,it is also product related matter.
So to settle this dispute, we create new table called: PRODUCT_BOXING_DETAILS and create one to many relationship from our last created table: SHIPMENT_PRODUCT_DETAIL which joins our so called two database design theoretical sections.
PRODUCT_BOXING_DETAILS:
This file contains bidirectional Unicode text that may be interpreted or compiled differently than what appears below. To review, open the file in an editor that reveals hidden Unicode characters. Learn more about bidirectional Unicode characters
And create one to many relationship from SHIPMENT_PRODUCT_DETAIL to PRODUCT_BOXING_DETAILS
SHIPMENT_PRODUCT_DETAIL on shipmentProductDetailsID PK (one) –> PRODUCT_BOXING_DETAILS on shipmentProductDetailsID FK (many)
As you can see, all those design issues happen in theory, because database thinks otherwise. Of-course, one can design his database in whatever way he wants.
Also, it is a good idea to set NON-CLUSTERED indexes on columns that we might use a lot. This will help speed up our SELECT Queries and BULK SELECT. You can as well combine CLUSTERED with NON-CLUSTERED indexes, depending on your needs of-course. There are also third party open source plugins for SSMS that let you do execution plans and at the end literally suggest what INDEX with what columns and what options to add, which will speed your query pretty much visible even to the naked eye, which is amazing because everyone is obsessed with speeding up his SQL queries.Tell me otherwise.
Below is the image of our created Distribution Outlet Database .
And SQL for this database is below, I named this database WH01:
This file contains bidirectional Unicode text that may be interpreted or compiled differently than what appears below. To review, open the file in an editor that reveals hidden Unicode characters. Learn more about bidirectional Unicode characters
)WITH (PAD_INDEX = OFF, STATISTICS_NORECOMPUTE = OFF, IGNORE_DUP_KEY = OFF, ALLOW_ROW_LOCKS = ON, ALLOW_PAGE_LOCKS = ON) ON [PRIMARY]
) ON [PRIMARY] TEXTIMAGE_ON [PRIMARY]
GO
ALTER TABLE [dbo].[PRODUCT_BOXING_DETAILS] WITH CHECK ADD CONSTRAINT [FK_PRODUCT_BOXING_DETAILS_SHIPMENT_PRODUCT_DETAIL] FOREIGN KEY([shipmentProductDetailsID])
ALTER TABLE [dbo].[PRODUCT_BOXING_DETAILS] CHECK CONSTRAINT [FK_PRODUCT_BOXING_DETAILS_SHIPMENT_PRODUCT_DETAIL]
GO
ALTER TABLE [dbo].[PRODUCT_DESCRIPTION] WITH CHECK ADD CONSTRAINT [FK_PRODUCT_DESCRIPTION_PRODUCT] FOREIGN KEY([productID])
REFERENCES [dbo].[PRODUCT] ([productID])
GO
ALTER TABLE [dbo].[PRODUCT_DESCRIPTION] CHECK CONSTRAINT [FK_PRODUCT_DESCRIPTION_PRODUCT]
GO
ALTER TABLE [dbo].[PRODUCT_DESCRIPTION_DETAIL] WITH CHECK ADD CONSTRAINT [FK_PRODUCT_DESCRIPTION_DETAIL_PRODUCT_DESCRIPTION] FOREIGN KEY([productDescriptionID])
Once database is done, we will go to Front End design, as mentioned in the beginning of this article, and create ASP.NET MVC project, add entity framework for our database, generate some test data,create nice cross device and cross browser design, and run our project first page.
We will use Bootstrap Cards. Below is picture of bootstrap card, captured and edited from my mobile phone,since cards fit similar information on the same sheet called Card.
I am not surprised if we will start programming using phones in the future as well .
But first lets populate our database with some test data:
Test Data:
At the end of this post, a link to download Visual Studio Solution
will be provided. There a file named WH01testdata.sql inside the
project has SQL to add data to our database.
Using Visual Studio 2015, let’s create new ASP.NET MVC with WebAPI support new project, name it MyDistributionOutlet,as shown in the image below:
The next step is to add EntityFramework to our newly created WH01 database.
Now, of-course you can build data access layer within your client app or program that will use your database. It does not need to be Entity Framework.But for me it is easier to use LINQ to SQL because it saves time, security against SQL injection built in, like parameterized query and even better, direct conversion to IEnumerable and easy direct way of manipulating and working with IQueryable, and of course transaction like approach to objects with the ability to commit multiple ADD operations at the same time, for example, with single commit.
So it is convenient as you can see, that’s why I use it.
To be honest with you, I am only going to write first page of searching product, the logic behind it, and copying a product functionality, in case you want to add similar product later on.
Now remember, all this is taking place in the context of our Distribution Outlet and people who are going to be using it there or “actors “.
The rest of the code I will let you write it on your own, like making a new ORDER object, saving it, and preparing to print it for the end user.
You can use this code as you wish, it is open source and with no license at all.
I will put the download link for the code and working video in the end,as with my other blog posts.
We will use Visual Studio 2012. Just for a change. You can use any version, but the process of creation ASP.NET MVC WEB API project is a little bit different.
Please create new ASP.NET WEB API Project and name it MyDistributionOutlet.
In the Views –> Shared directory, in _Layout.cshtml page, in the header, add the following links:
And in the <body> tag, right after it, and before @RenderBody() add our newly designed SEARCH and NAVIGATION Cross Device, mobile and desktop menu: by the way, I spent quite a while designing this menu because I did not want anything there, and also I wanted and needed text box to be the same size on desktop and also when zoomed on mobile viewport:
This file contains bidirectional Unicode text that may be interpreted or compiled differently than what appears below. To review, open the file in an editor that reveals hidden Unicode characters. Learn more about bidirectional Unicode characters
Run the project in debug or release mode, and you will see those two images respectively:
DESKTOP VIEW:
DESKTOP VIEW
MOBILE VIEW:
MOBILE IPHONE 8 VIEW
ZOOMED AND MINIMIZED BROWSER VIEWPORT VIEW:
BROWSER ZOOMED VIEW
As you can see, HTML5 Rocks ! Anyways, this is just front page when the app starts. You can also add login capability so the start screen would be your desired login screen, but it is up to you to add it or not.
This menu contains search box, where you can type product name and get all products by that or similar name, also, you can select Grid View, and instead of default Cards view you will have regular gridview with sub menu for supplier for each product.
The shipment or search by shipment is intentionally left for you on your choice to implement or not.
We will continue by our plan, if you scroll back to the beginning of this post, I said that we will first do database design, which is back end, then switch completely to front end design, (what we are doing now).So we will continue thinking in those terms and not jump around here and there.
Next in our front end design, we need a search page that will display our search results. Lets design it ! Here is the code for search page that we have designed once the user clicks on search button, goes to search Action Result (ActionResult Search), which in its turn will return GridSearch view OR SearchProduct view respectively.
GridSearch view will display our search results in a grid view, and SearchProduct view will display our results in Cards layout. You can as well, mix,and create views with traditional web forms.
Since both of these views will contain our Model data as in Model View Controller, we need a model, we will create two classes in Models folder:
SearchProductModel
SearchProductModelList
And at the top of GridSearch view and at the top of SearchProduct.aspx page we will add the following:
Notice the inherits directive. This is how we pass the model to ASP.NET web page.
Also, we used master page, in order not to put search box on each page.
OK,Then we add new folder called EntityFramework, and add to it EDMX or ADO.NET Entity Data Model, and call it WH01Entities
Now switch to Controllers folder as per Model View Controller and in our HomeController add Search ActionResult, as shown below:
This file contains bidirectional Unicode text that may be interpreted or compiled differently than what appears below. To review, open the file in an editor that reveals hidden Unicode characters. Learn more about bidirectional Unicode characters
Also, as I mentioned before, we will add functionality to COPY a product. Copying a product is nothing but adding a prodctCopied field in PRODUCT_DESCRIPTION table.
We will add this code below in our HomeController:
This file contains bidirectional Unicode text that may be interpreted or compiled differently than what appears below. To review, open the file in an editor that reveals hidden Unicode characters. Learn more about bidirectional Unicode characters
The test data and database creation script is available inside the project folder once you download the solution, in test-data.sql file and wh01-tables.sql respectively.
So once we do all this, and fill in some test data,we will see those pages:
DESKTOP CARDS DEFAULT RESULT (AFTER SEARCH CLICK)
DESKTOP CARDS MOBILE RESULT (AFTER SEARCH CLICK)
And card list continues down below if you scroll down.
And:
DESKTOP ZOOMED HTML 5 VIEW PORT:
Also, if you scroll the list will go down and down, with the cards list that our search returned.
The GRID VIEW page:
It contains sub-report, and EDIT functionality on the same page.