In the previous post, we created a FIDO2 and WebAuthn .NET Core WebApi as a separate project (back end) and a separate NextJs project as a front end app in order to log in with no password. The previous two projects ran on localhost. They can be found in this blog post:
First of all, we have to store our MongoDb connection string in Azure Vault. We will need to create the following resources in Azure first, and in the following sequence as well. KeyVault will store the secret and the rest is also needed to publish the API and host it in Azure:
- Resource Group
- AppService Plan
- Web App
- KeyVault
Create Resource Group:
az group create --name yourchosennamerg --location "EastUs
Create an App Service plan
az appservice plan create --name yourchosenserviceplanname --resource-group yourchosennamerg --sku FREE
Create a Web App
az webapp create --resource-group yourchosennamerg --plan yourchosenserviceplanname --name webappname
Create AzureKeyVault
az keyvault create --name "yourchosenkeyvaultname" --resource-group "yourchosennamerg " --location "EastUs"
Create managed identity
az webapp identity assign --name "yourwebappname" --resource-group "yourchosennamerg "
From the above commands, you will see the following returned:
{
 "principalId": "990e548b-a928-4f51-8c7e-9k75648h",
  "tenantId": "3a91548b-8c7e-a928-9ca5-3a91548b",
  "type": "SystemAssigned",
  "userAssignedIdentities": null
}
Grab the principalId and use it to assign the managed identity in order to give your web app permission to do get and list operations on your key vault, pass the principalId to the az keyvault set-policy command:
Assign Managed Identity
az keyvault set-policy --name "yourkeyvaultname" --object-id "990e548b-a928-4f51-8c7e-9k75648h" --secret-permissions get list
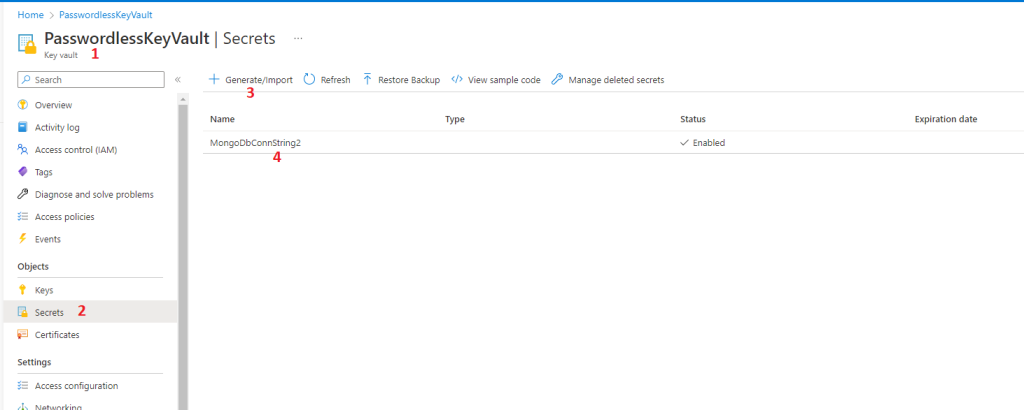
Now either from the code or inside Azure Portal, navigate to newly created KeyVault and add the MongoDb connection string as key value pair:
Alternatively, we can use PowerShell to create all the needed resources above right from command line. Copy the code below all of it into powershell and all the needed resources will be created:
#Connect to your Azure subscription if you are not already connected
Connect-AzAccount

# Create a resource group
New-AzResourceGroup -Name "rgpasswordless" -Location "EastUs"

# Create an App Service plan
New-AzAppServicePlan -Name "passwordlessserviceplan" -ResourceGroupName "rgpasswordless" -Location "EastUs" -Tier Free

# Create a web app
New-AzWebApp -ResourceGroupName "rgpasswordless" -AppServicePlan "passwordlessserviceplan" -Name "passwordlessapicorenext"

# Create a key vault
New-AzKeyVault -Name "PasswordlessKeyVault" -ResourceGroupName "rgpasswordless" -Location "EastUs"

# Assign a managed identity to the web app
Set-AzWebApp -AssignIdentity $true -Name "passwordlessapicorenext" -ResourceGroupName "rgpasswordless"

#Get PrincipalID
$principalId = (az webapp identity show --name "passwordlessapicorenext" --resource-group "rgpasswordless" | ConvertFrom-Json).principalId

#Set keyvaule access policy
Set-AzKeyVaultAccessPolicy -VaultName "PasswordlessKeyVault" -ObjectId $principalId -PermissionsToSecrets get,list

#Set the required secret in keyvault
$secretValue = ConvertTo-SecureString -String "YOURMONGODBCONNECTIONSTRING" -AsPlainText -Force
Set-AzKeyVaultSecret -VaultName "PasswordlessKeyVault" -Name "MongoDbConnString2" -SecretValue $secretValue
In the solution itself, and in terminal, bash or powershell, run the following commands to add the references to the API project in order to use KeyVault itself:
dotnet add package Azure.Identity
dotnet add package Azure.Security.KeyVault.Secrets
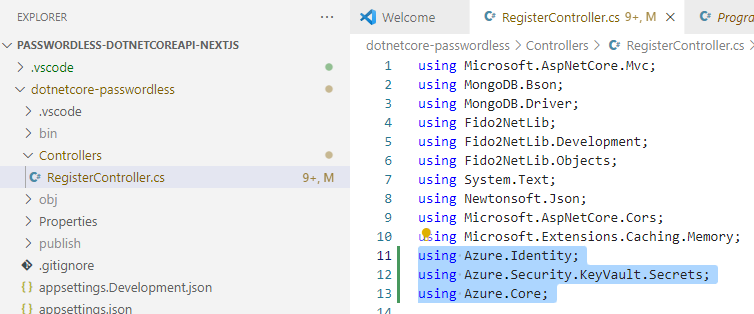
Then at the top of RegisterController, add using statements
using Azure.Identity;
using Azure.Security.KeyVault.Secrets;
using Azure.Core;
After this we can use the following code block to replace the MongoDb connection string with Azure Key Vault secret, which is considered as a global variable in Azure. We can also write a helper method or database access layer in our API and add this code once. For the purpose of this demo, I put all the code in a single file.
SecretClientOptions options = new SecretClientOptions()
    {
        Retry =
        {
            Delay= TimeSpan.FromSeconds(2),
            MaxDelay = TimeSpan.FromSeconds(16),
            MaxRetries = 5,
            Mode = RetryMode.Exponential
         }
    };
var client = new SecretClient(new Uri("https://PasswordlessKeyVault.vault.azure.net/"), new DefaultAzureCredential(),options);

KeyVaultSecret secret = client.GetSecret("MongoDbConnString2");

string secretValue = secret.Value;
The next step is to switch to our terminal inside VSCode and publish our API locally:
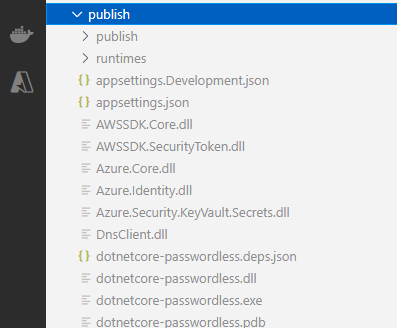
dotnet publish -c Release -o ./publish
This will create a publish directory inside our API. Then, right click on the publish folder and navigate to Deploy To Web App

In the output tab of bottm panel in VSCode you will see these lines at the end of deployment:
9:44:08 PM passwordlessapicorenext: Copying file: 'publish\publish\web.config'
9:44:08 PM passwordlessapicorenext: Deleting app_offline.htm
9:44:08 PM passwordlessapicorenext: Finished successfully.
9:44:08 PM passwordlessapicorenext: Running post deployment command(s)...
9:44:08 PM passwordlessapicorenext: Triggering recycle (preview mode disabled).
9:44:09 PM passwordlessapicorenext: Deployment successful.
9:44:17 PM: Deployment to "passwordlessapicorenext" completed.
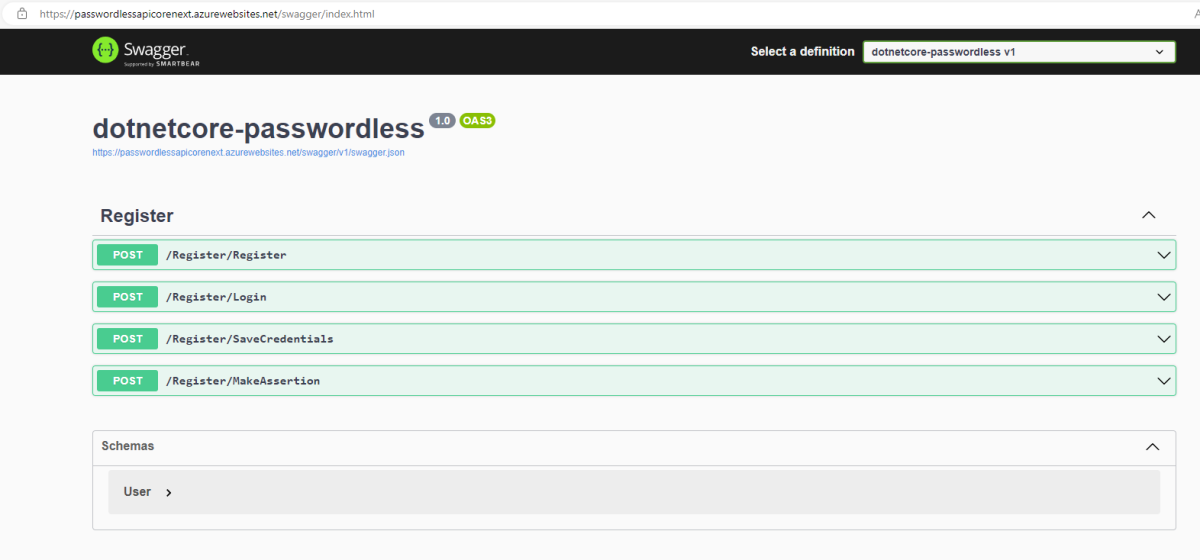
Then, navigate to your Azure Portal, and to your subscription ofcourse, then click on your WebApp and copy the Default Domain value. In my case it is: passwordlessapicorenext.azurewebsites.net
Add https://, and add swagger at the end of URL, so it becomes like this: https://passwordlessapicorenext.azurewebsites.net/swagger
Click enter and you should be able to see the swagger page with available API endpoints:

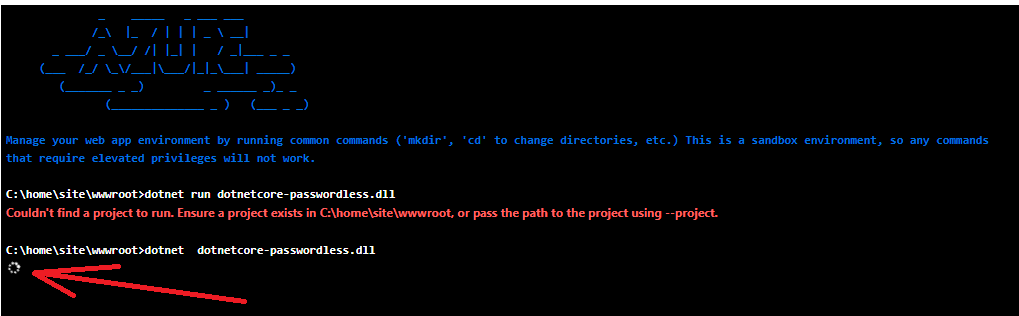
If you get 500.30 In-Process Startup Failure error open console inside your WebApp as below:

When the console opens, type:
dotnet dotnetcore-passwordless.dll
The name of the dll you can find it in publish directory locally when we published the API locally:
If everything is ok, you should see turning circle that never stops. Most of the startup errors should appear here in console, very detailed:
Another way to deploy this API would be by packaging everything to Acure Container Registry and adding our image to Azure Container Instance with the help of Docker.
Thank you.


