In this post, we are going to create a small ReactJs SPA (Single Page Application) that shows Biorhythms for a person with particular date of birth, and for selected month of his or her choice.
To know more about Biorhythms, please visit this page: https://en.wikipedia.org/wiki/Biorhythm_(pseudoscience)
Our landing page will look like this:
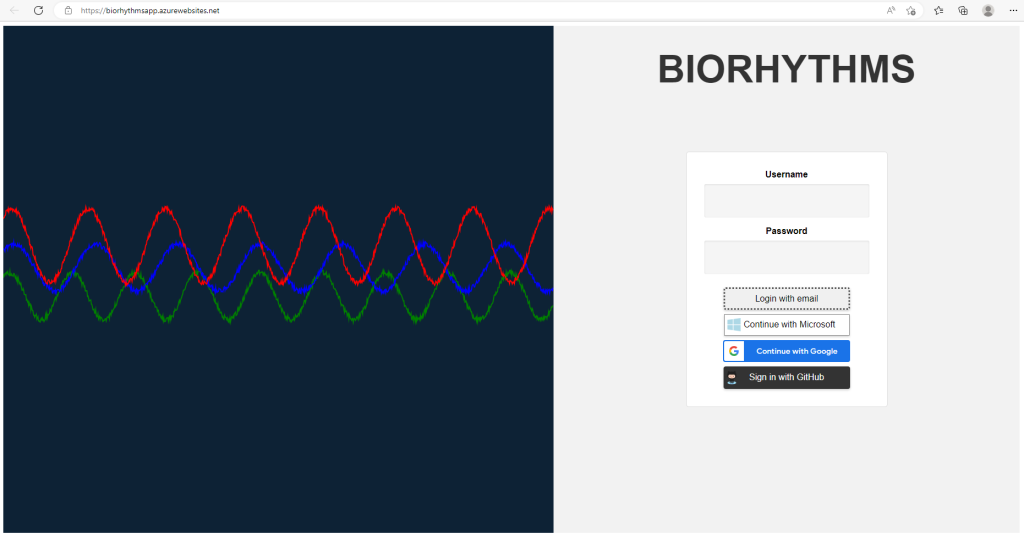
The Login with email button, I did not add any functionality to it, because it is clear and obvious. Grab user’s username and password and check if he or she is in your database of choice, verify the password, then allow them to sign in. You can even sign them in Passwordlessly, as I wrote in my previous blog post here: https://thoughtsonprogramming.wordpress.com/2023/02/26/build-a-passwordless-app-with-fido2-webauthn-net-core-api-nextjs-and-mongodb/
The three buttons below: Microsoft, Google, and GitHub, will allow the user to sign in to our SPA if they have account in any of the mentioned above providers.
Let’s start with GitHub flow, because it requires additional setup.
Before we use the GitHub button, we have to create an application on Github. Navigate to https://github.com/settings/developers and create an app. Save client secret and client secret key. Also add the Homepage URL and Authorization callback URL

We are using react-github-login package, where the authentication flow is handled by the GitHub API,specifically the OAuth 2.0 authentication protocol. This package utilizes the following GitHub API endpoint for authentication: https://github.com/login/oauth/authorize which sends us back “code” or Authorization code. Then we use that code to call our serverless function in Azure to obtain a token : https://biorhythms1234.azurewebsites.net/api/token
Serverless Azure Function
#r "Microsoft.Azure.WebJobs.Extensions.Http"

using System.Net;
using Microsoft.Azure.WebJobs.Extensions.Http;
using Microsoft.AspNetCore.Http;
using Microsoft.AspNetCore.Mvc;

public static async Task<IActionResult> Run(HttpRequest req, ILogger log)
{
    var actokentoreturn = "";
    try
    {
    log.LogInformation("C# HTTP trigger function processed a request.");

    string code = req.Form["code"];

    HttpClient httpClient = new HttpClient();

    var parameters = new FormUrlEncodedContent(new[]
    {
        new KeyValuePair<string, string>("client_id", "f26b2fd9fb46af5e35c8"),
        new KeyValuePair<string, string>("client_secret", "087831a55003b26b914caefcbea583cd92009f59"),
        new KeyValuePair<string, string>("code", code),
    });

    var response = await httpClient.PostAsync("https://github.com/login/oauth/access_token", parameters);

    var content = await response.Content.ReadAsStringAsync();
    var parts = content.Split('&');
    var accessToken = parts[0].Split('=')[1];
    actokentoreturn = accessToken;
    log.LogInformation("The token is: " + actokentoreturn);
    }
    catch(Exception exp)
    {
        log.LogInformation("Exception:" + exp);
    }
    return new OkObjectResult(actokentoreturn);
}
If your Serverless function executes successfully, you should see similar to the below output in the Azure CLI log:
Connected!
2023-03-20T03:18:41Z   [Information]   Executing 'Functions.token' (Reason='This function was programmatically called via the host APIs.', Id=b7056219-4978-45cf-b986-0b7370929643)
2023-03-20T03:18:41Z   [Information]   C# HTTP trigger function processed a request.
2023-03-20T03:18:41Z   [Information]   The token is: 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
2023-03-20T03:18:41Z   [Information]   Executed 'Functions.token' (Succeeded, Id=b7056219-4978-45cf-b986-0b7370929643, Duration=132ms)
After we get the token, we use this token to get the logged in successfully user’s informtion: (getUserDetails function).
getUserDetails function
  //Provided we have the token, this function gets github user details like name and repo URL, among others.
  const getUserDetails = async (authtoken) => {
    const octokit = new Octokit({
      auth: authtoken,
    });

    const { data } = await octokit.users.getAuthenticated();
    // handle user details
    setAuthState({
      isAuthenticated: true,
      user: data.login,
      name: data.url,
      accessToken: null,
      signinprovider: "GitHub",
    });
    setLoggedIn(true);
  };
The button that triggers the internal package flow is:
 <GithubLogin
                    className="githubBtn"
                    clientId="f26b2fd9fb46af5e35c8"
                    onSuccess={onGitHubSuccess}
                    onFailure={onGitHubFailure}
                    redirectUri="https://biorhythmsapp.azurewebsites.net/"
                  />
And it is imported from the npm package:
import GithubLogin from "react-github-login";
The onSuccess above, triggers our onGitHubSuccess function, where we get the token, then users details:
  const onGitHubSuccess = async (response) => {
    const code = response.code;
    const data = {
      code: response.code,
    };
    const options = {
      method: "POST",
      headers: {
        "Content-Type": "application/x-www-form-urlencoded",
      },
      body: new URLSearchParams(data),
    };

    fetch("https://biorhythms1234.azurewebsites.net/api/token", options)
      .then((response) => response.text())
      .then((data) => getUserDetails(data))
      .catch((error) => console.error(error));
  };
Microsoft Login Button
The Microsoft Login Button setup and code is a little but different than GitHub’s :
 <button class="ms-login"  onClick={login} >
      <span class="icon">
               <TfiMicrosoftAlt style={{ color: "lightblue" }} />
     </span>
     <span class="text">Continue with Microsoft</span>
 </button>
When the button is clicked, we trigger the login JavaScript’s front end function, because there are node.js functions that run on the back end, but we are not using them in our demo ReactJs SPA app.
We are using Microsoft Azure Active Directory authentication scheme, which is commonly used for Microsoft online services such as Microsoft 365, Azure, and Dynamics CRM, among others.We are using a tenant-independent endpoint, which can be used by any Azure AD tenant to authenticate users with a Microsoft account or an Azure AD account. When a user attempts to log in using this URL, they are directed to the appropriate Azure AD tenant, based on their email domain or the tenant information provided in the request.
We are using the following import:
import { PublicClientApplication } from "@azure/msal-browser";
Then we instanciate an msal instance from above:
 const msalInstance = new PublicClientApplication(msalConfig);
//msalConfig are configuration details. You can find them in the code. They are :
  const msalConfig = {
    auth: {
      clientId: "f01391ee-72aa-4d4a-a90a-00a4fba26bfc",
      authority: "https://login.microsoftonline.com/common",
      redirectUri: "https://biorhythmsapp.azurewebsites.net",
      //redirectUri: "http://localhost:3000",
    },
  };
This code initializes a new instance of the Microsoft Authentication Library (MSAL) with the provided configuration object msalConfig.The PublicClientApplication class is used to create a new instance of MSAL for public client applications, which typically run in a web browser or a mobile app.
Once the msalInstance is created, it can be used to interact with the Azure Active Directory (Azure AD) to authenticate the user and obtain access tokens that can be used to access protected resources such as APIs, on behalf of the user.
The msalInstance provides a set of methods to handle the authentication flow, such as loginRedirect() and loginPopup(), to get access tokens silently or with a popup window, respectively. You can get the clientID and redirectUri from AppRegistration page in Azure Active Directory. Yes AAD and not AADB2C ! We are not using Azure Active Directory B2C.
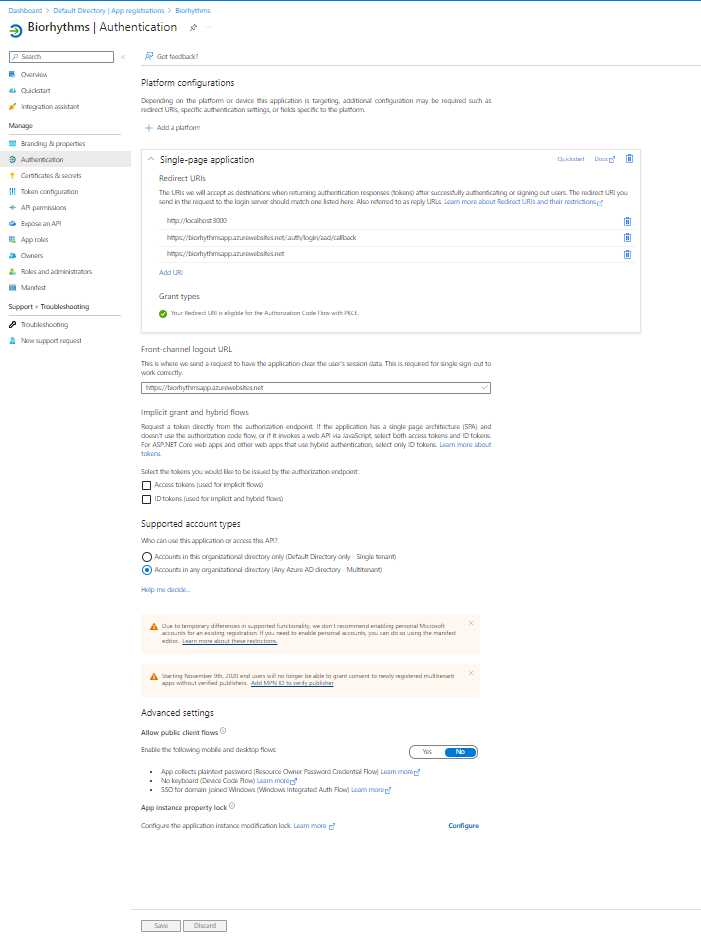
Here is how our AppRegistration page looks in Azure Active Directory –> Authentication tab:
After the Microsoft Login button is clicked, login function triggers:
  const login = async () => {
    try {
      const loginResponse = await msalInstance.loginPopup({
        scopes: scopes,
        prompt: "select_account",
        pkce: true, // Use PKCE to protect against authorization code interception attacks
      });
      setAuthState({
        isAuthenticated: true,
        user: loginResponse.account.username,
        name: loginResponse.account.name,
        accessToken: null,
        signinprovider: "Microsoft",
      });
      setLoggedIn(true);
    } catch (err) {
      console.log(err);
    }
  };
Also, in order for this login function and msal to work correctly, and to avoid CORS errors, by the way, CORS (Cross-Origin Resource Sharing) error is a security feature implemented by web browsers to prevent web pages from making requests to a different domain than the one that served the original page. When a website tries to access resources from a different domain, such as an API, the web browser may block the request and display a CORS error message.
CORS error occurs when a web application running in one domain tries to access resources located in another domain. By default, web browsers restrict such access to protect the user’s data and privacy. To enable cross-domain requests, the server hosting the resources needs to add special headers to the HTTP response, allowing requests from specific origins.
The CORS error message typically includes the following information:
- The reason for the error (e.g., Access-Control-Allow-Origin missing)
- The URL of the page that made the request
- The URL of the resource that was requested
- The HTTP response code (e.g., 403 Forbidden, 404 Not Found)
To resolve a CORS error, you can either:
- Add the necessary CORS headers to the server-side response to allow cross-origin requests
- Use a proxy server (in the GitHUb button example, we created a serverless Azure function that acts like a proxy to the server from whom we need to get a response) to make the request on behalf of the client-side code, bypassing the same-origin policy.
But for Microsoft Login Button functionality it is enough to add the necessary CORS Headers in Azure. After you create your AppService ( described in detail a little down below), click on your AppService (biorhythmsapp in our case) and then under the API secrtion, click on CORS. We should see this page:
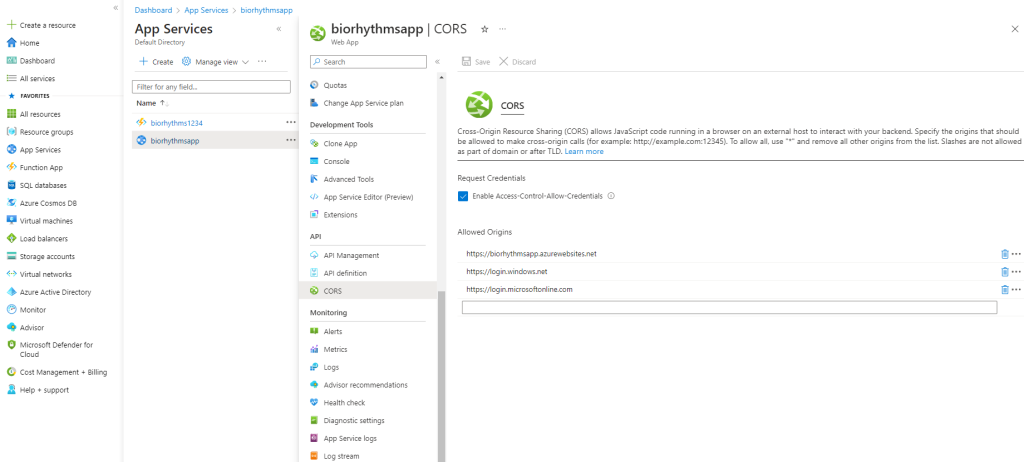
Click on “Enable-Access-Control-Allow-Credentials” and add allowed origins. In our case the allowed origins are:
- URL of our newly created app: Biorhythms (biorhythmsapp.azurewebsites.net)
- https://login.windows.net
- https://login.microsoftonline.com
(pkce: true,) above in the code is a security feature introduced in OAuth 2.0 to prevent an attacker from intercepting and using an authorization code that is returned during the authorization flow.
PKCE does this by adding an additional layer of security to the authorization flow, by using a dynamically generated code challenge that is sent along with the authorization request, and a code verifier that is used to validate the code challenge when the authorization code is returned.
By using PKCE, the MSAL library ensures that the authorization code that is returned during the authentication flow can only be used by the intended client application, and cannot be intercepted and used by an attacker.
This helps to protect against certain types of attacks such as man -in -the – middle attacks and token replay attacks.
In order to use Azure AD and register our app there, we need to create our app first locally, and then upload it to Azure. But before uploading, we have to prepare Azure environment first.
Open your Azure Shell and run the following commands:
# Connect to Azure
Connect-AzAccount

# Create a resource group
New-AzResourceGroup -Name "rgbiorhythms" -Location "EastUs"

# Create an App Service plan
New-AzAppServicePlan -Name "biorhythmsserviceplan" -ResourceGroupName "rgbiorhythms" -Location "EastUs" -Tier Free

# Create new web app
New-AzWebApp -ResourceGroupName "rgbiorhythms" -Name "biorhythmsapp" -Location "EastUs" -AppServicePlan "biorhythmsserviceplan"
After we add the necessary code to our current React App, or clone it from my GitHub account : https://github.com/jinan-kordab/asure-authentication , then we need to build it, zip it, and publish it to Azure App Service:
# Build the React App
npm run build

#After that generate zipped file that we will publish to Azure
Compress-Archive -Path "C:\<YOUR PATH TO THE BUILD DIRECTORY GENERATED IN PREVIOUS STEP>\build" -DestinationPath "C:\<ROOT PATHE OF YOUR PROJECT>\build.zip" -Force

#Publish our ReactJs biorhythms app
Publish-AzWebapp -ResourceGroupName "rgbiorhythms" -Name "biorhythmsapp" -ArchivePath ./build.zip
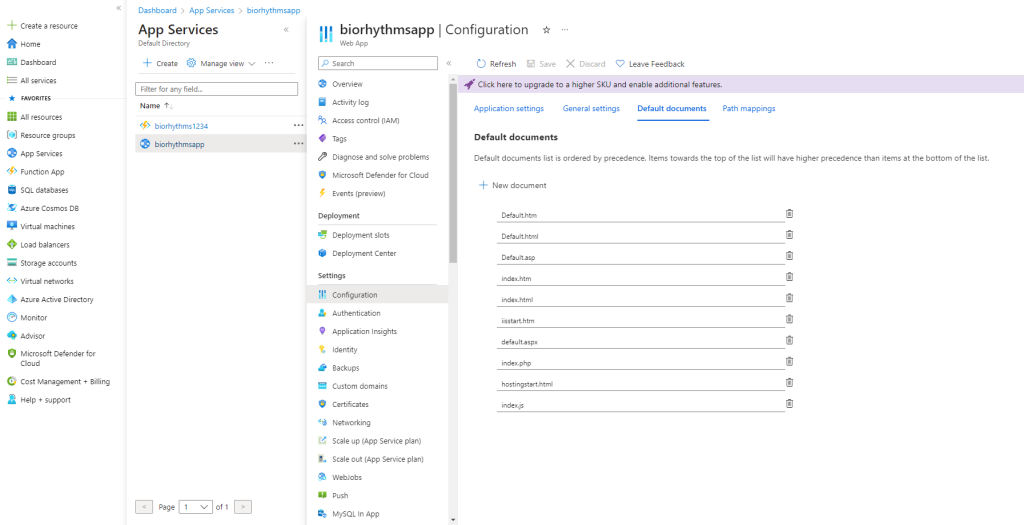
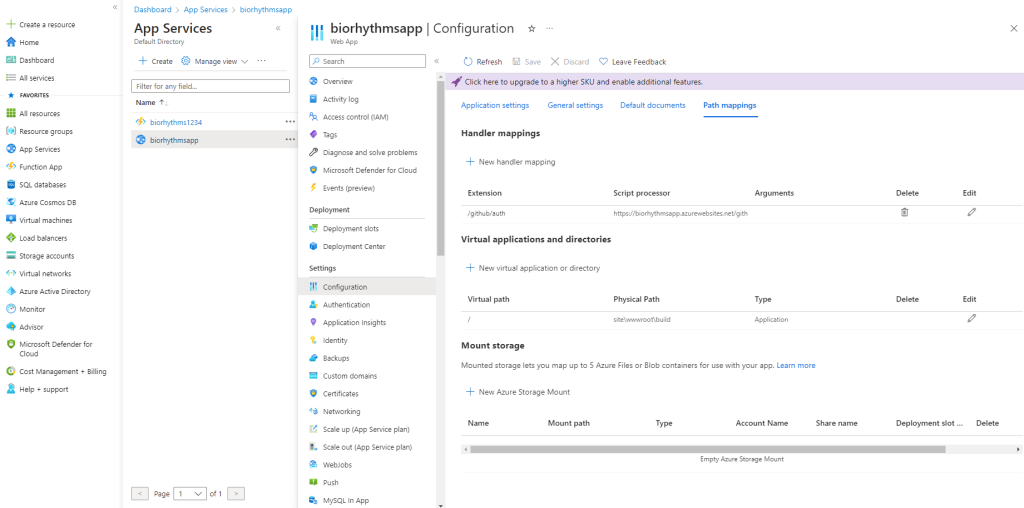
Once the publish is successful, we need to set index.js as default document, and virtual path to: \site\wwwroot\build
The default document and virtual path can be done in Azure by clicking on AppService, then clicking on Configuration:
Google Login Button
Before using Google Button, navigate to https://console.cloud.google.com/ . There create new application, and grab the Client ID and Client secret. Add as well Authorized JavaScript origins, and Authorized redirect URIs.
In order to use Google Login button, we are using @react-oauth/google package from npm. The @react-oauth/google package is a client-side library that provides a React component for implementing a Google login flow in a web application using the OAuth 2.0 protocol.
When using this library, the authentication flow is handled by the Google API, specifically the Google OAuth 2.0 authentication protocol.
The @react-oauth / google package utilizes the following Google API endpoint for authentication: https://accounts.google.com/o/oauth2/v2/auth
This endpoint is used to initiate the OAuth 2.0 authorization flow, which allows the user to grant permission to the application to access their Google account.
Once the user has granted permission, the library uses another Google API endpoint to exchange the authorization code for an access token and a refresh token https://oauth2.googleapis.com/token This endpoint returns a JSON object containing the access token, refresh token, and other details related to the authorization.
The access token returned by this endpoint is a JWT(JSON Web Token)
To decode this token, we use the following import:
import jwt_decode from "jwt-decode";
The jwt_decode is a function, which is a utility library for decoding JSON Web Tokens (JWTs). The decoded JWT token contains information about the user.
Here is our GoogleButton:
<GoogleLogin
                    text="continue_with"
                    width="231"
                    theme="filled_blue"
                    shape="rectangular"
                    onSuccess={handleGoogleSignIn}
                    onError={() => {
                      console.log("Login Failed");
                    }}
                    scope="https://www.googleapis.com/auth/userinfo.profile https://www.googleapis.com/auth/userinfo.email"
                  />
Onsuccess, we call handleGoogleSignIn function:
  async function handleGoogleSignIn(credentialResponse) {
    const token = credentialResponse.credential;
    const decoded = jwt_decode(token);
    setAuthState({
      isAuthenticated: true,
      user: decoded.name,
      name: decoded.email,
      accessToken: null,
      signinprovider: "Google",
    });
    setLoggedIn(true);
  }